SSh 客户端完全使用指南

Authentication
当我们使用 ssh 连接到一台远程服务器的时候,需要输出 username, passoword 来进行登录
但是这样子容易遇到一些安全问题,比如说一台 server(public ip) 可能会遇到,密码爆破攻击,为了安全考虑,我们可以使用 ssh key
generate ssh key
1 | |
-t: type,指定算法 rsa
-b: bits,指定安全位数,rsa 建议至少 2048
-C: comments,注释
-f: 指定输出文件名
这样就会生成 ~/.ssh/<key-filename>(私钥) 和 ~/.ssh/<key-filename>.pub(公钥)
生成过程中可以选择是否给私钥加 passphrase(密码短语)。如果加了,在登录时需要输入 passphrase
一般来说我们写的注释(note),通常记录在公钥文件的结尾处,可以直接打开 .pub 文件查看
对于文件名,我们最好起一个有意义的名字,例如 Singapore-Linux-VM-SSH-Key
e.g.
1 2 3 4 5 6 7 8 9 10 11 12 13 14 15 16 17 18 19 20 | |
Note
如果在 windows powershell 环境中,这个命令会让你输入2次 passphrase 之后会失败并且报错
powershell
Generating public/private rsa key pair.
Enter passphrase (empty for no passphrase):
Enter same passphrase again:
Saving key "~/.ssh/github-ssh-key" failed: No such file or directory
这是因为在某些版本的 powershell 中 ~ 符号没有被 PowerShell 解析后再传递给命令
例如 Powershell does not expand '~' for external programs · Issue #20031 · PowerShell/PowerShell
add ssh key to remote server
既然已经生成了 ssh key, 我们就需要将 public key 添加到 remote server中去
command
1 | |
如果使用默认的 22 号端口,可以省略 -p <ssh-port> 参数
e.g.
1 2 3 4 5 6 7 8 9 10 | |
Note
-
在 windows powershell 环境下无法使用
ssh-copy-id命令,此时可以打开 git bash 去运行这个命令 -
如果在 server 上配置了禁止 password 登录,这个命令很可能会失败。或许可以试试看这个命令:
shell
  ssh-copy-id -i new-key.pub -o "IdentityFile=old-key" -p <port> user@IP
下次可以试试看,目前我没有尝试过
manual
如果命令的方式行不通,那么我们可以手动的将 pub key 添加到 server 上去
先登录 server, 打开 ~/.ssh/authorized_keys 文件,将 .pub 结尾的内容复制进去
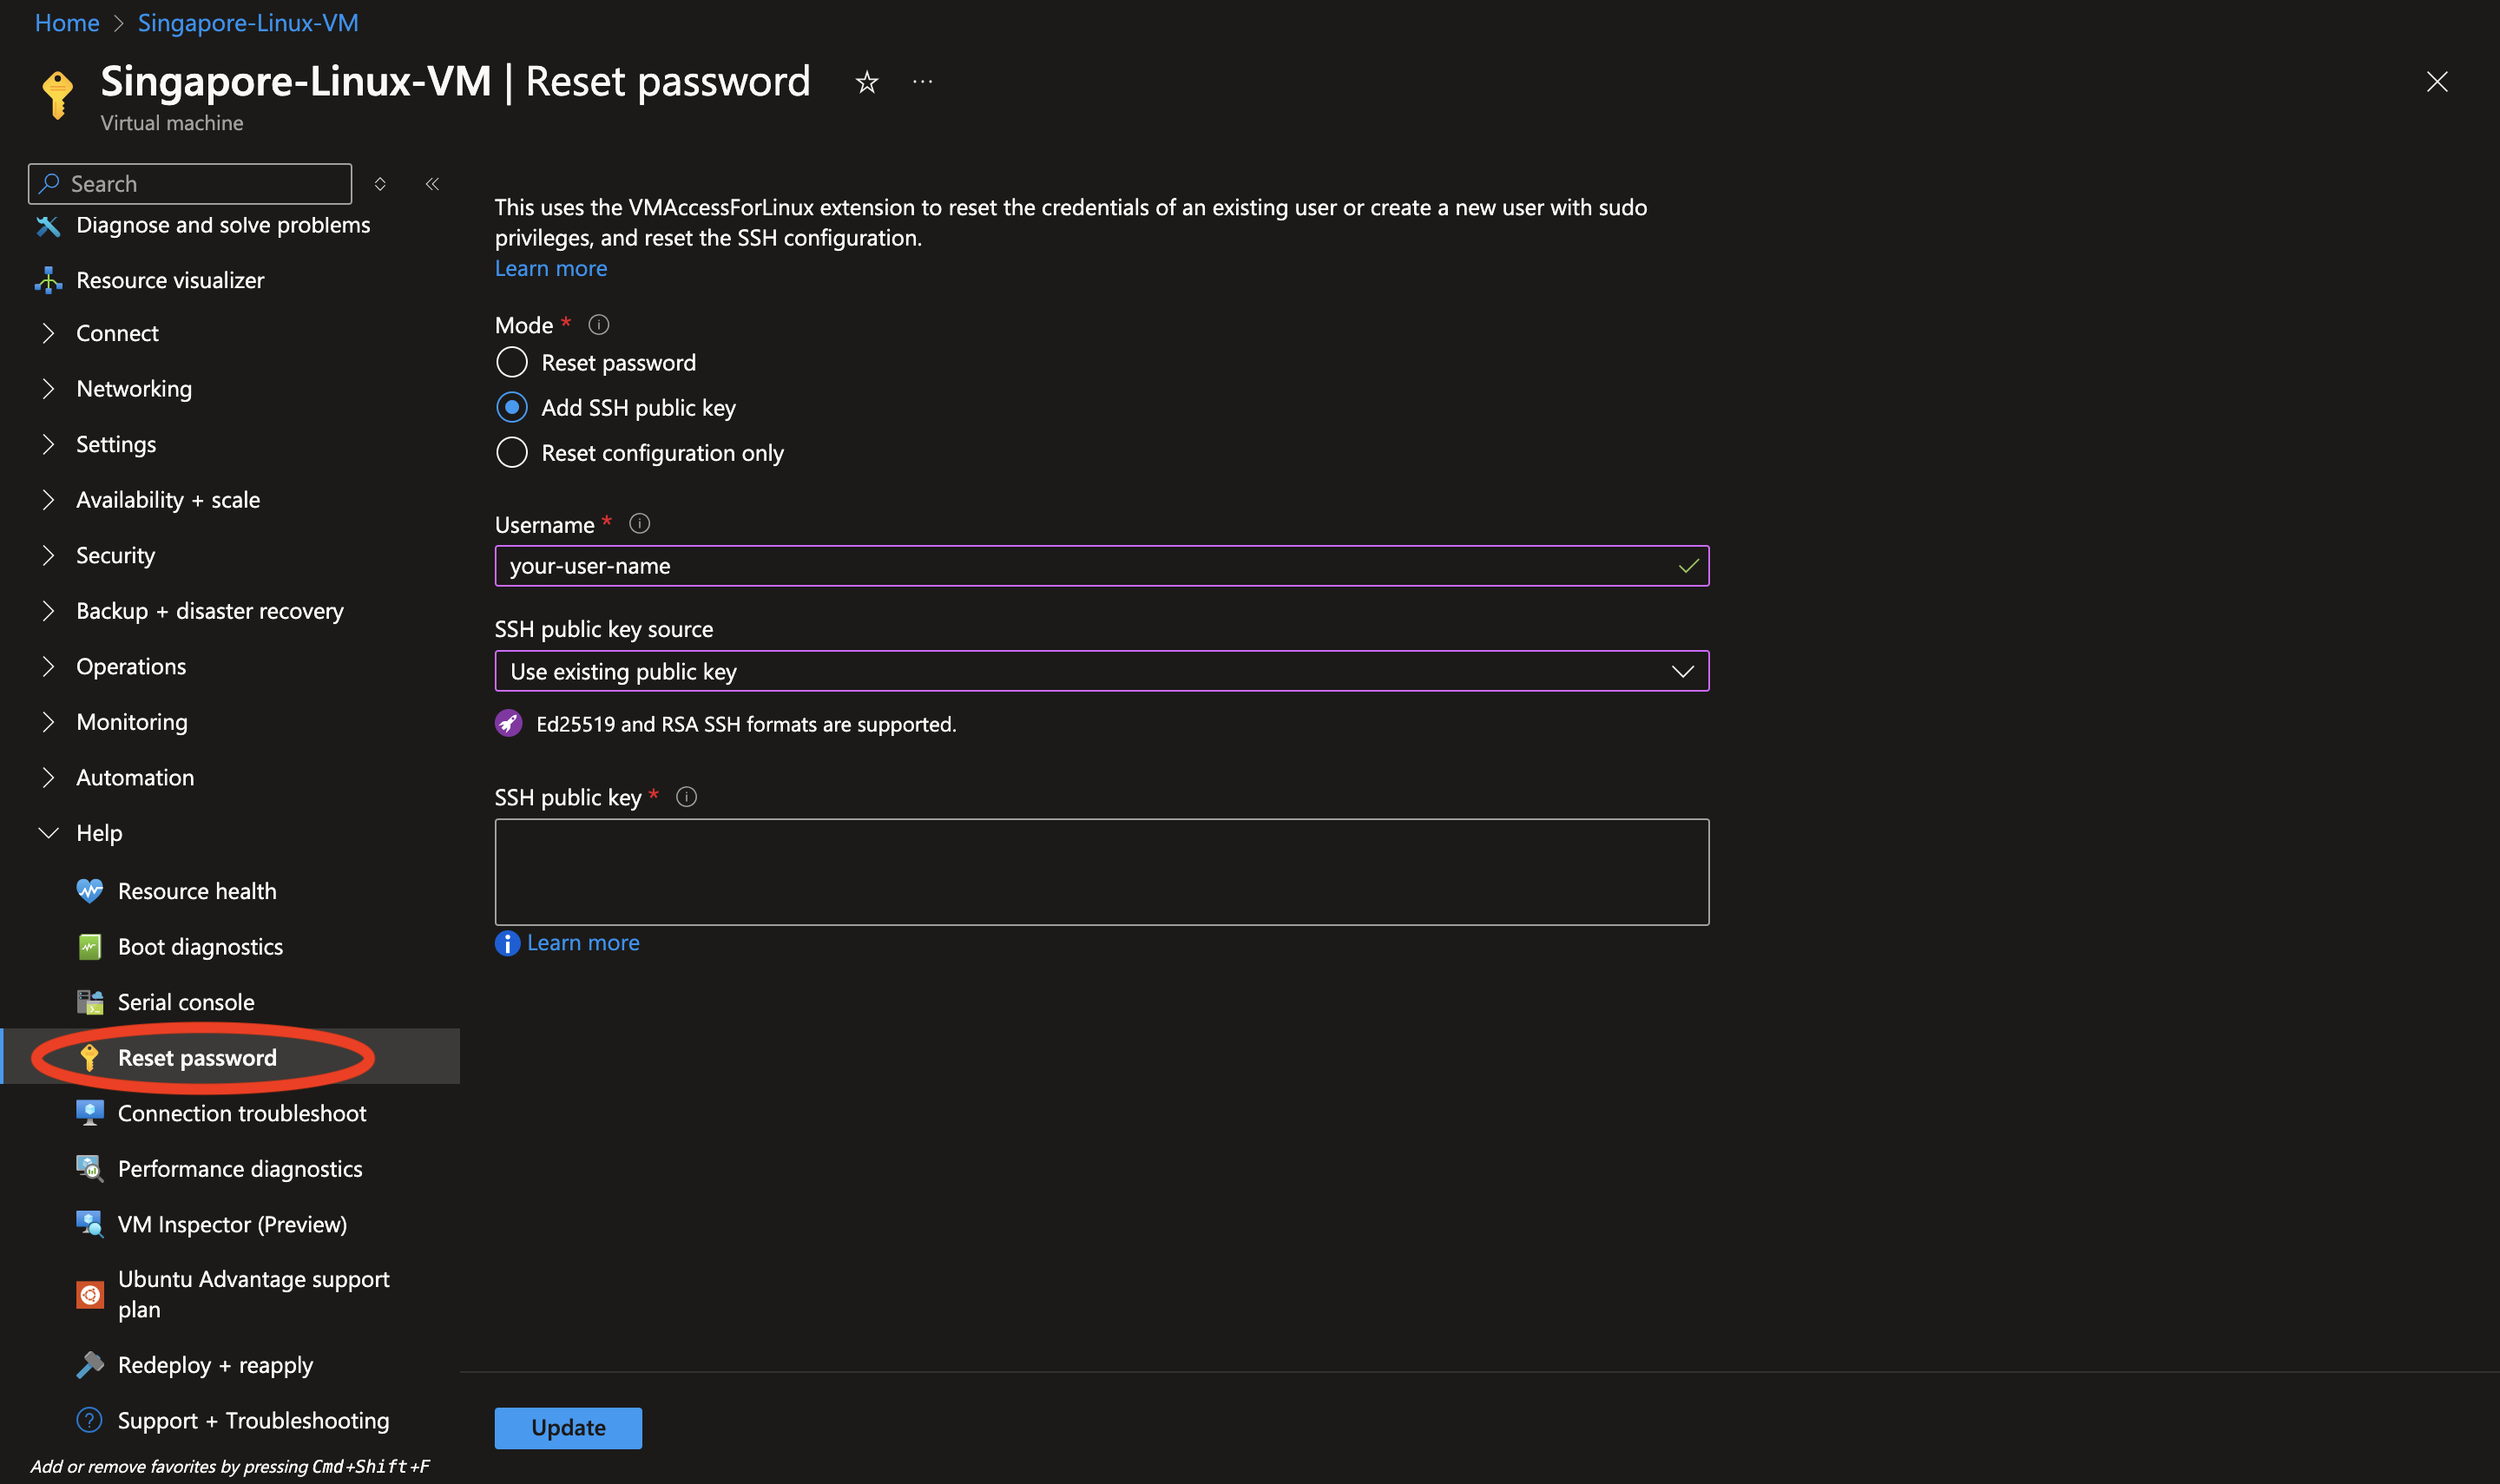
azure vm
如果用的是 azure linux vm 可以在 azure portal 中添加 ssh public key
gcp vm
在 gcp 中则是需要进入 VM instance edit 这个位置:
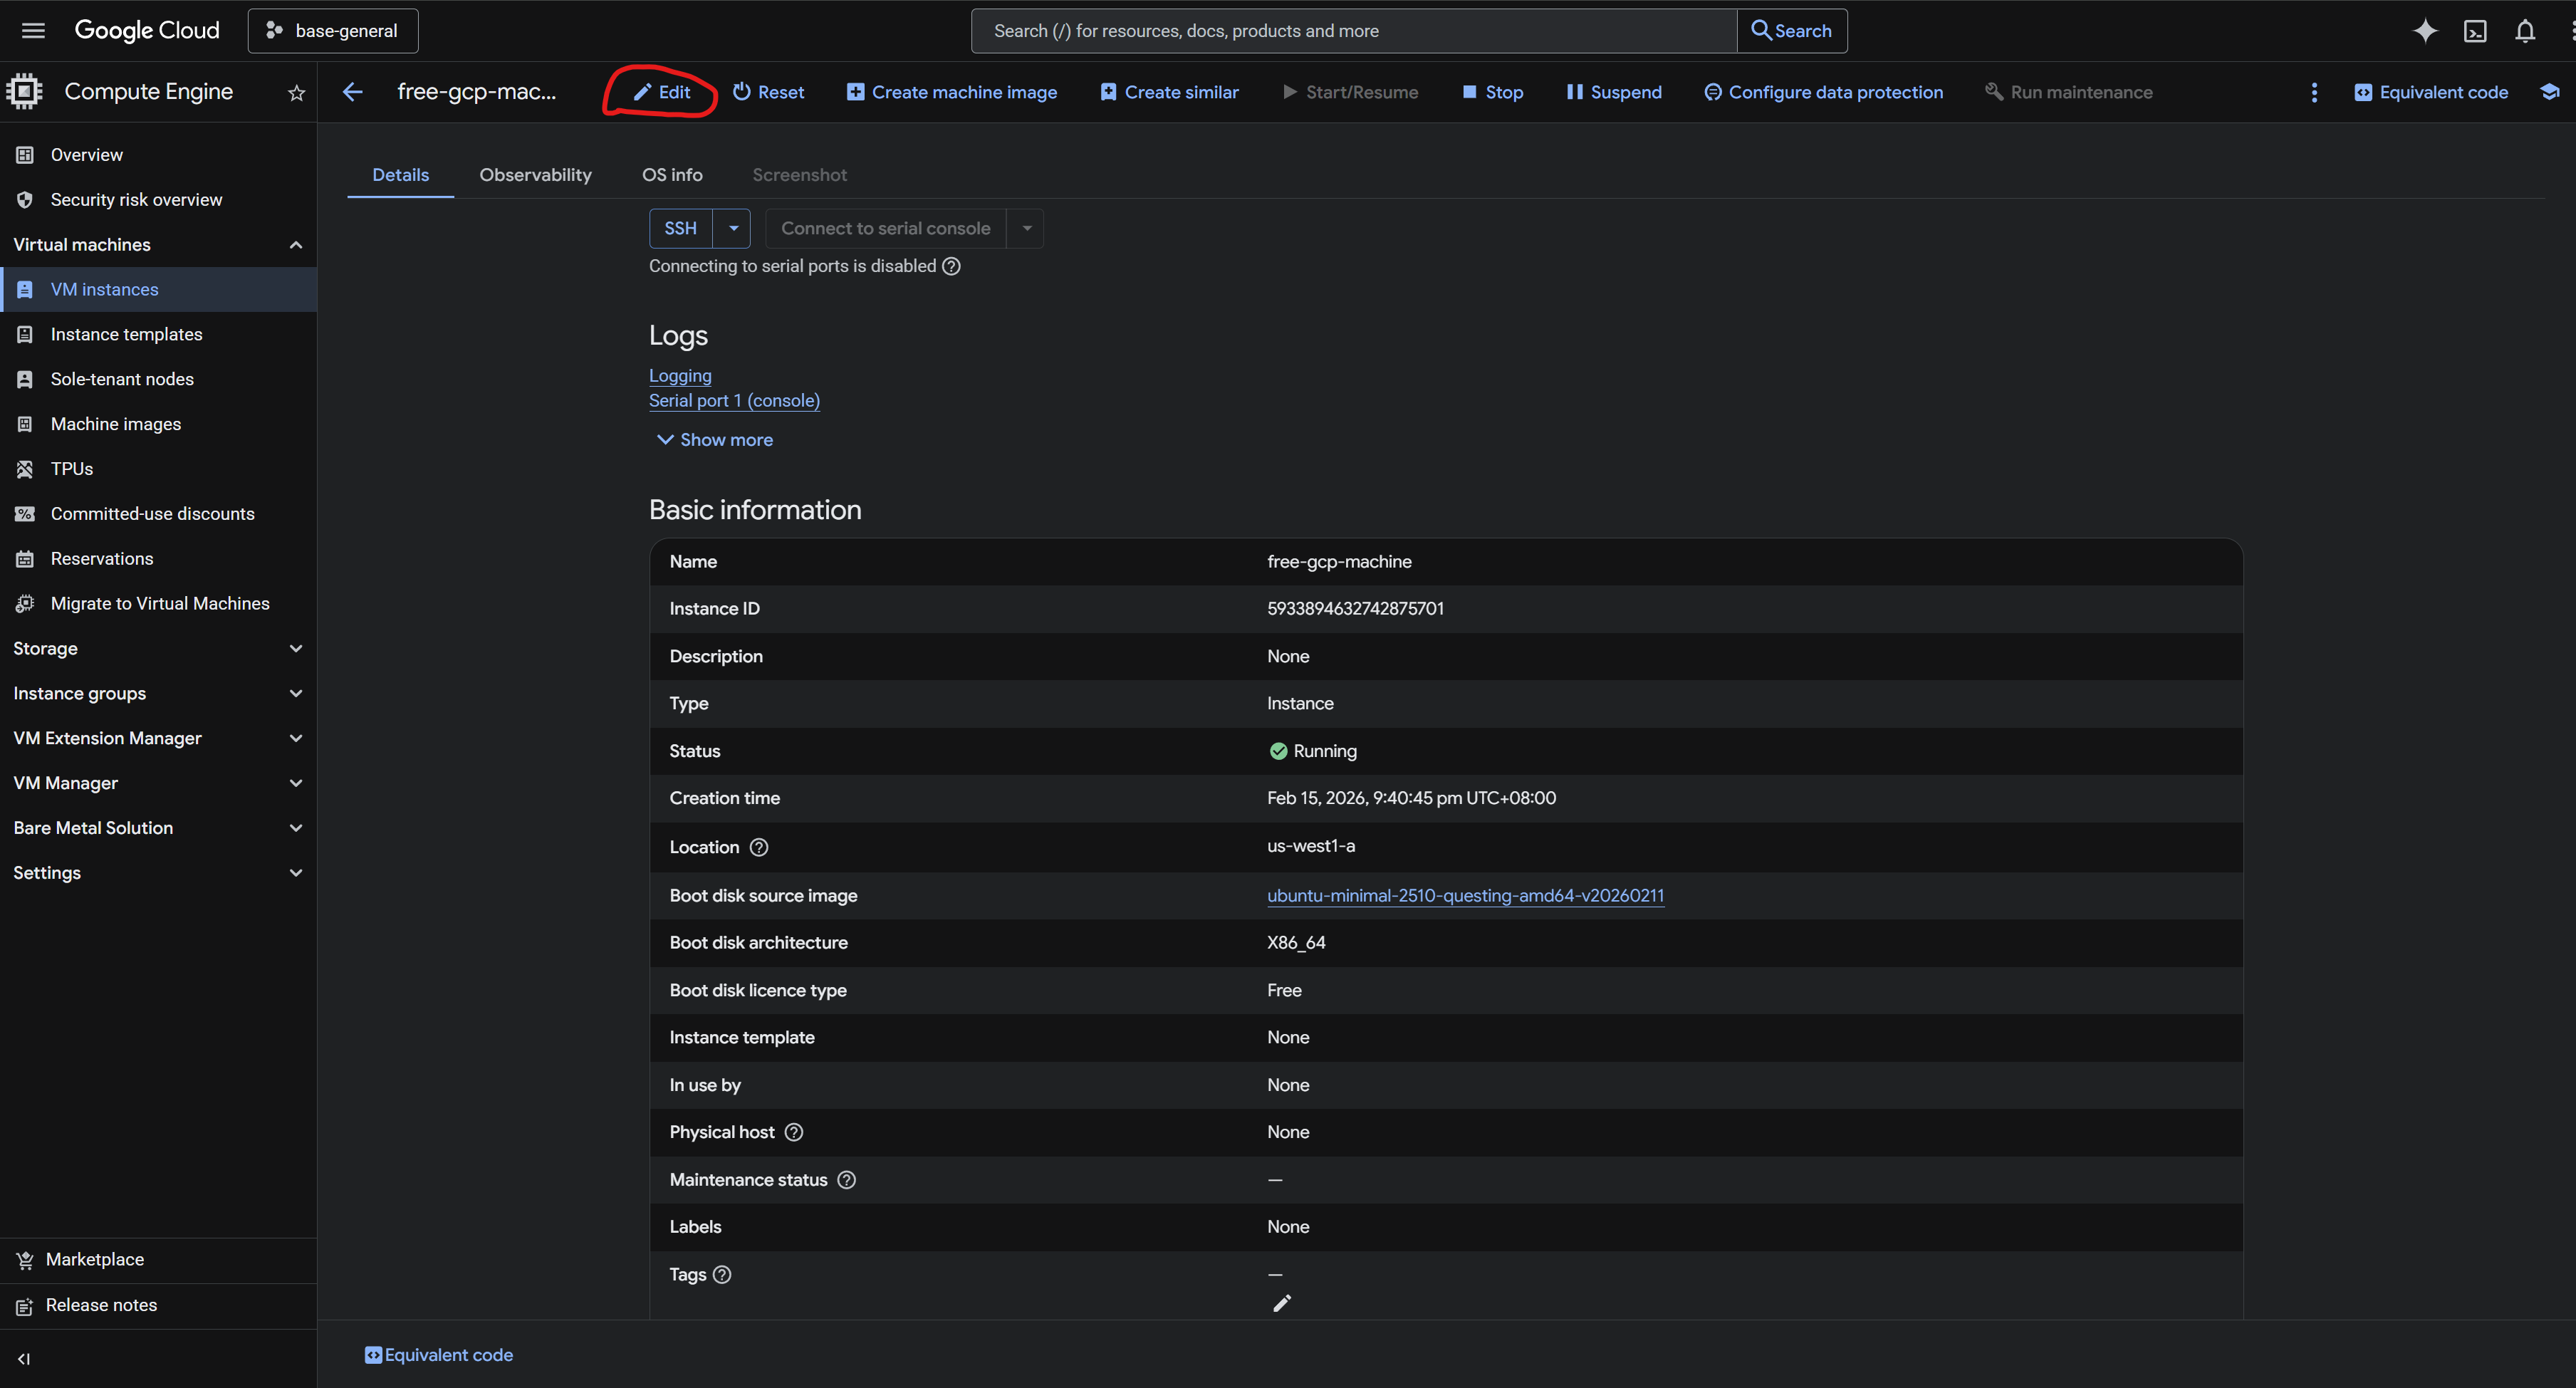
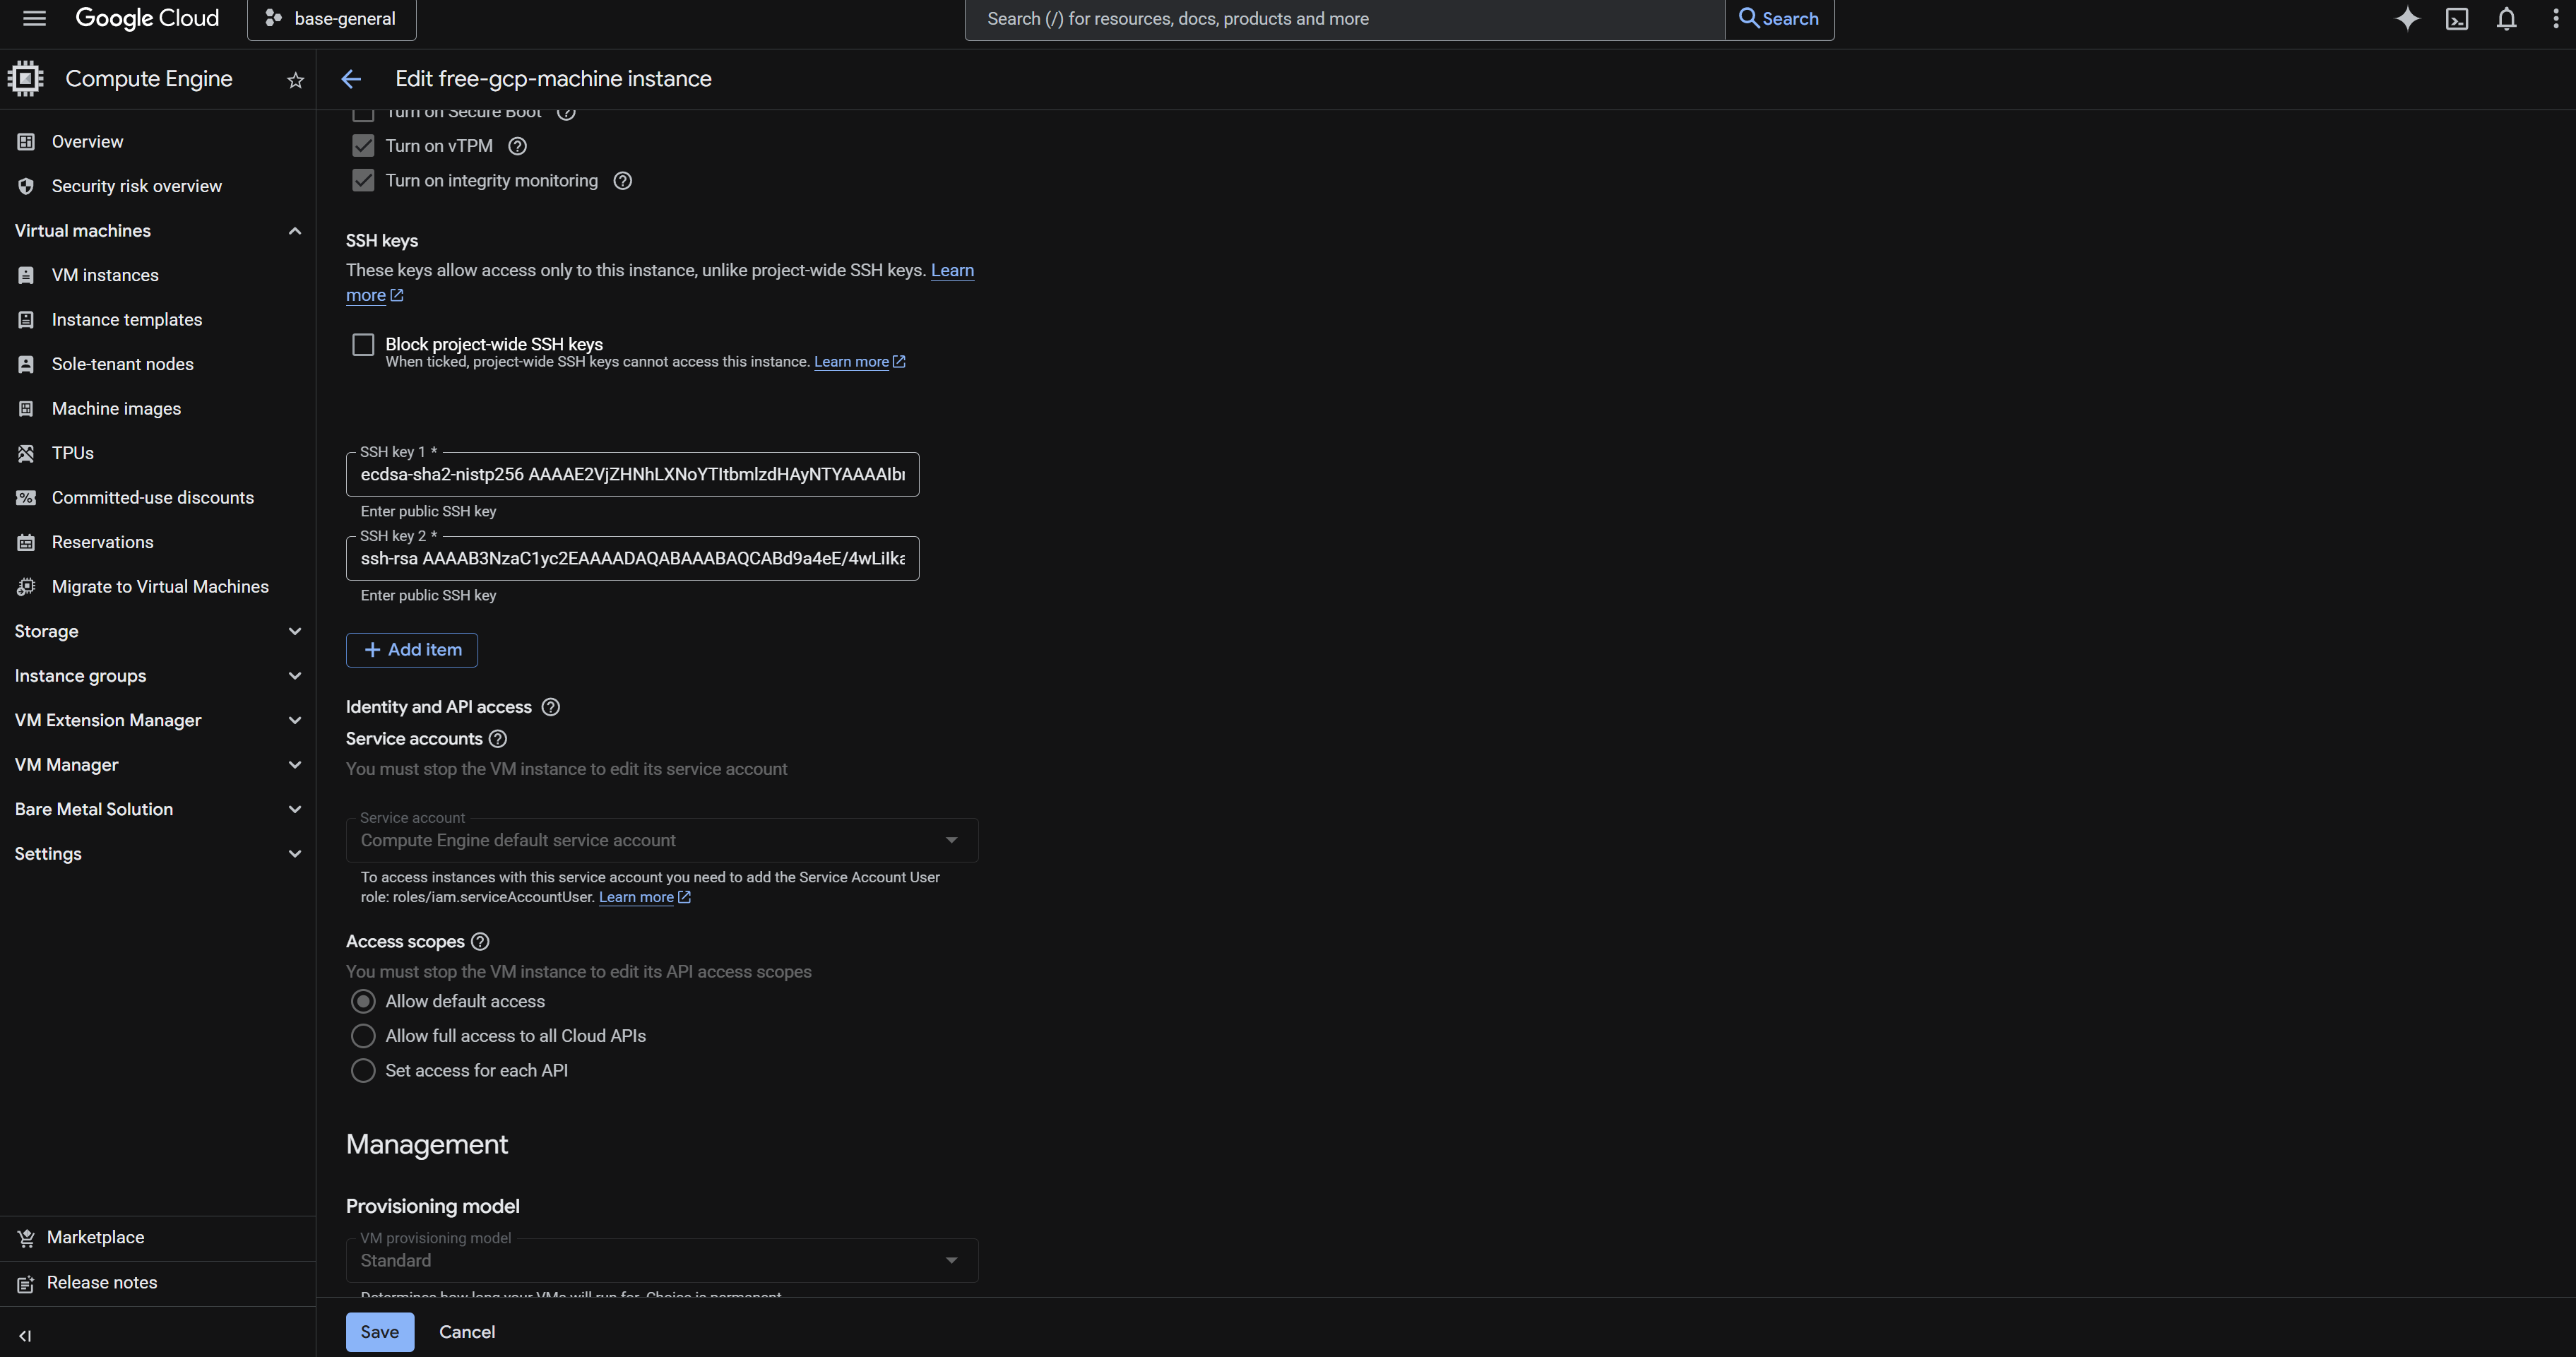
进入 edit 之后往下滑动就能看见 ssh key
ssh-key login
如果我们直接用 ssh username@remote-server-ip,SSH 默认会仅尝试 id_rsa 这样默认命名的密钥
所以我们需要在命令行临时指定:
1 | |
当然为了方便起见,我们往往在 ~/.ssh/config 中添加配置,让 SSH 自动知道该请求要用哪个 key,举例:
1 2 3 4 | |
然后只要 ssh remote-server 即可自动使用该密钥。
Key Management
SSH Agent 用于存储解密后的私钥(在内存中缓存已解密的私钥),使得只需要只输入一次 passparsh,就可以在会话期间重复使用
也就是说如果私钥没有密码,不需要 SSH Agent,因为 SSH 可以直接读取私钥文件。
如果私钥有密码,没有 SSH Agent 每次使用 SSH 连接时都需要输入密码,有 SSH Agent 只需在添加密钥到 Agent 时输入一次密码
windows setting
查看 ssh agent 服务
1 | |
启动服务
1 | |
如果需要,设置为自动启动
1 | |
添加 ssh key 到 ssh agnet
1 | |
查看已经添加的 ssh key
1 | |
linux setting
首先查看 ssh-agnet 是否已经启动
1 | |
如果 ssh-agent 运行中,会显示其进程 ID (PID);如果没有运行,则输出为空。
如果显示为空,那么使用下面的命令启动 ssh-agent
1 | |
添加 SSH 私钥:
1 | |
持久化
为了实现持久化,你可以将这些命令添加到你的 shell 配置文件中。根据你使用的 shell,可以是:
对于 Bash(~/.bashrc 或 ~/.bash_profile):
1 2 3 | |
保存文件后,重新加载配置:
1 | |
这样设置后,每次打开新的终端会话时,ssh-agent 都会自动启动,并且会添加你的 SSH 密钥。
Configuration
ssh 配置文件一般默认路径是 ~/.ssh/config 这个文件本质上是 SSH 客户端的全局配置文件,支持许多的功能。
不过我们先来看看他最基础的功能:简化连接命令,将复杂的将复杂的 ssh 命令参数转化为一个 host, 用 ssh <Host> 命令快速登录,无需每次都输入一系列复杂的参数
一个经典的配置如下
1 2 3 4 5 6 7 8 9 10 | |
- AddKeysToAgent yes
ssh client 在验证成功后,自动把解密后的密钥存入 ssh-agent(如果 ssh-agent 没有此时没有启动,则不会生效)。
如果没有这一条,那么 ssh-agent 是不会在你 ssh 链接服务器的时候自动获得你的密钥的,也就是说需要你手动 ssh-add 那个 key
- ServerAliveInterval 20
SSH 客户端每 20 秒给服务器发一次应用层心跳包,防止链路被当成“空闲连接”而回收。
- ServerAliveCountMax 6
连续 6 次心跳没收到回复 ssh client 才断开链接,防止网络抖动时立刻断。
- TCPKeepAlive yes
启用操作系统 TCP 层 keepalive。
- IPQoS none
不设置 SSH 流量的 DSCP/QoS 标记。绕过某些网络设备对特定 QoS 标记处理不当导致的掉线/限速。
Tip
在 vscode 的 remote-ssh 插件中使用 Remote-SSH: Open SSH Configuration File... 同样编辑的就是这个文件。
通过编辑这个文件,我们可以为不同主机指定私钥,例如为个人服务器和公司服务器使用不同密钥。GitHub 或 GitLab 配置不同密钥。
1 2 3 4 5 6 7 8 | |
Important
注意 ssh config 不支持直接配置密码