SSH 客户端完全使用指南

Before we beginning
当我们使用 SSH 连接到一台远程服务器的时候,需要输入 username、password 来进行登录。
但是这样子容易遇到一些安全问题,比如说一台 server(public ip)可能会遇到密码爆破攻击。出于安全考虑,我们通常会使用 SSH key。
Connection Basics
一次 SSH 连接通常由下面几个部分组成:
User:登录远程服务器时使用的 usernameHostName:远程服务器的 public ip、private ip 或 domain namePort:SSH server 监听的 port,默认是22Authentication:认证方式,例如 password 或 SSH key
最基础的连接命令如下:
1 | |
如果 SSH server 使用的不是默认 22 号端口,则需要指定 port:
1 | |
Create A Key Pair
使用下面的命令生成 SSH key:
1 | |
-t: type 指定算法 rsa
-b: bits 指定安全位数,rsa 建议至少 2048
-C: comments 注释
-f: file 指定输出文件名
这样就会生成 ~/.ssh/<key-filename>(私钥) 和 ~/.ssh/<key-filename>.pub(公钥)
生成过程中我们可以选择是否给私钥加 passphrase(密码短语)。如果加了,在登录时需要输入 passphrase 来解密私钥。
而我们写的注释(note),会记录在公钥文件的结尾处,可以直接打开 .pub 文件查看。
对于文件名,我们最好起一个有意义的名字,例如 Singapore-Linux-VM-SSH-Key。
e.g.
1 2 3 4 5 6 7 8 9 10 11 12 13 14 15 16 17 18 19 20 | |
Note
如果在 Windows PowerShell 环境中,这个命令会让你输入 2 次 passphrase 之后会失败并且报错:
powershell
Generating public/private rsa key pair.
Enter passphrase (empty for no passphrase):
Enter same passphrase again:
Saving key "~/.ssh/github-ssh-key" failed: No such file or directory
这是因为在某些版本的 PowerShell 中 ~ 符号没有被 PowerShell 解析后再传递给命令。
例如 Powershell does not expand '~' for external programs · Issue #20031 · PowerShell/PowerShell
Install The Public Key
既然已经生成了 SSH key,我们就需要将 public key 添加到 remote server 中去。
Use ssh-copy-id
1 | |
如果使用默认的 22 号端口,可以省略 -p <ssh-port> 参数。
e.g.
1 2 3 4 5 6 7 8 9 10 | |
Note
在 Windows PowerShell 环境下无法使用 ssh-copy-id 命令,此时可以打开 Git Bash 去运行这个命令。
Add authorized_keys Manually
如果命令的方式行不通,那么我们可以手动将 public key 添加到 server 上去。
先登录 server,打开 ~/.ssh/authorized_keys 文件,将 .pub 结尾的内容复制进去。
Add Key in Cloud VM Console
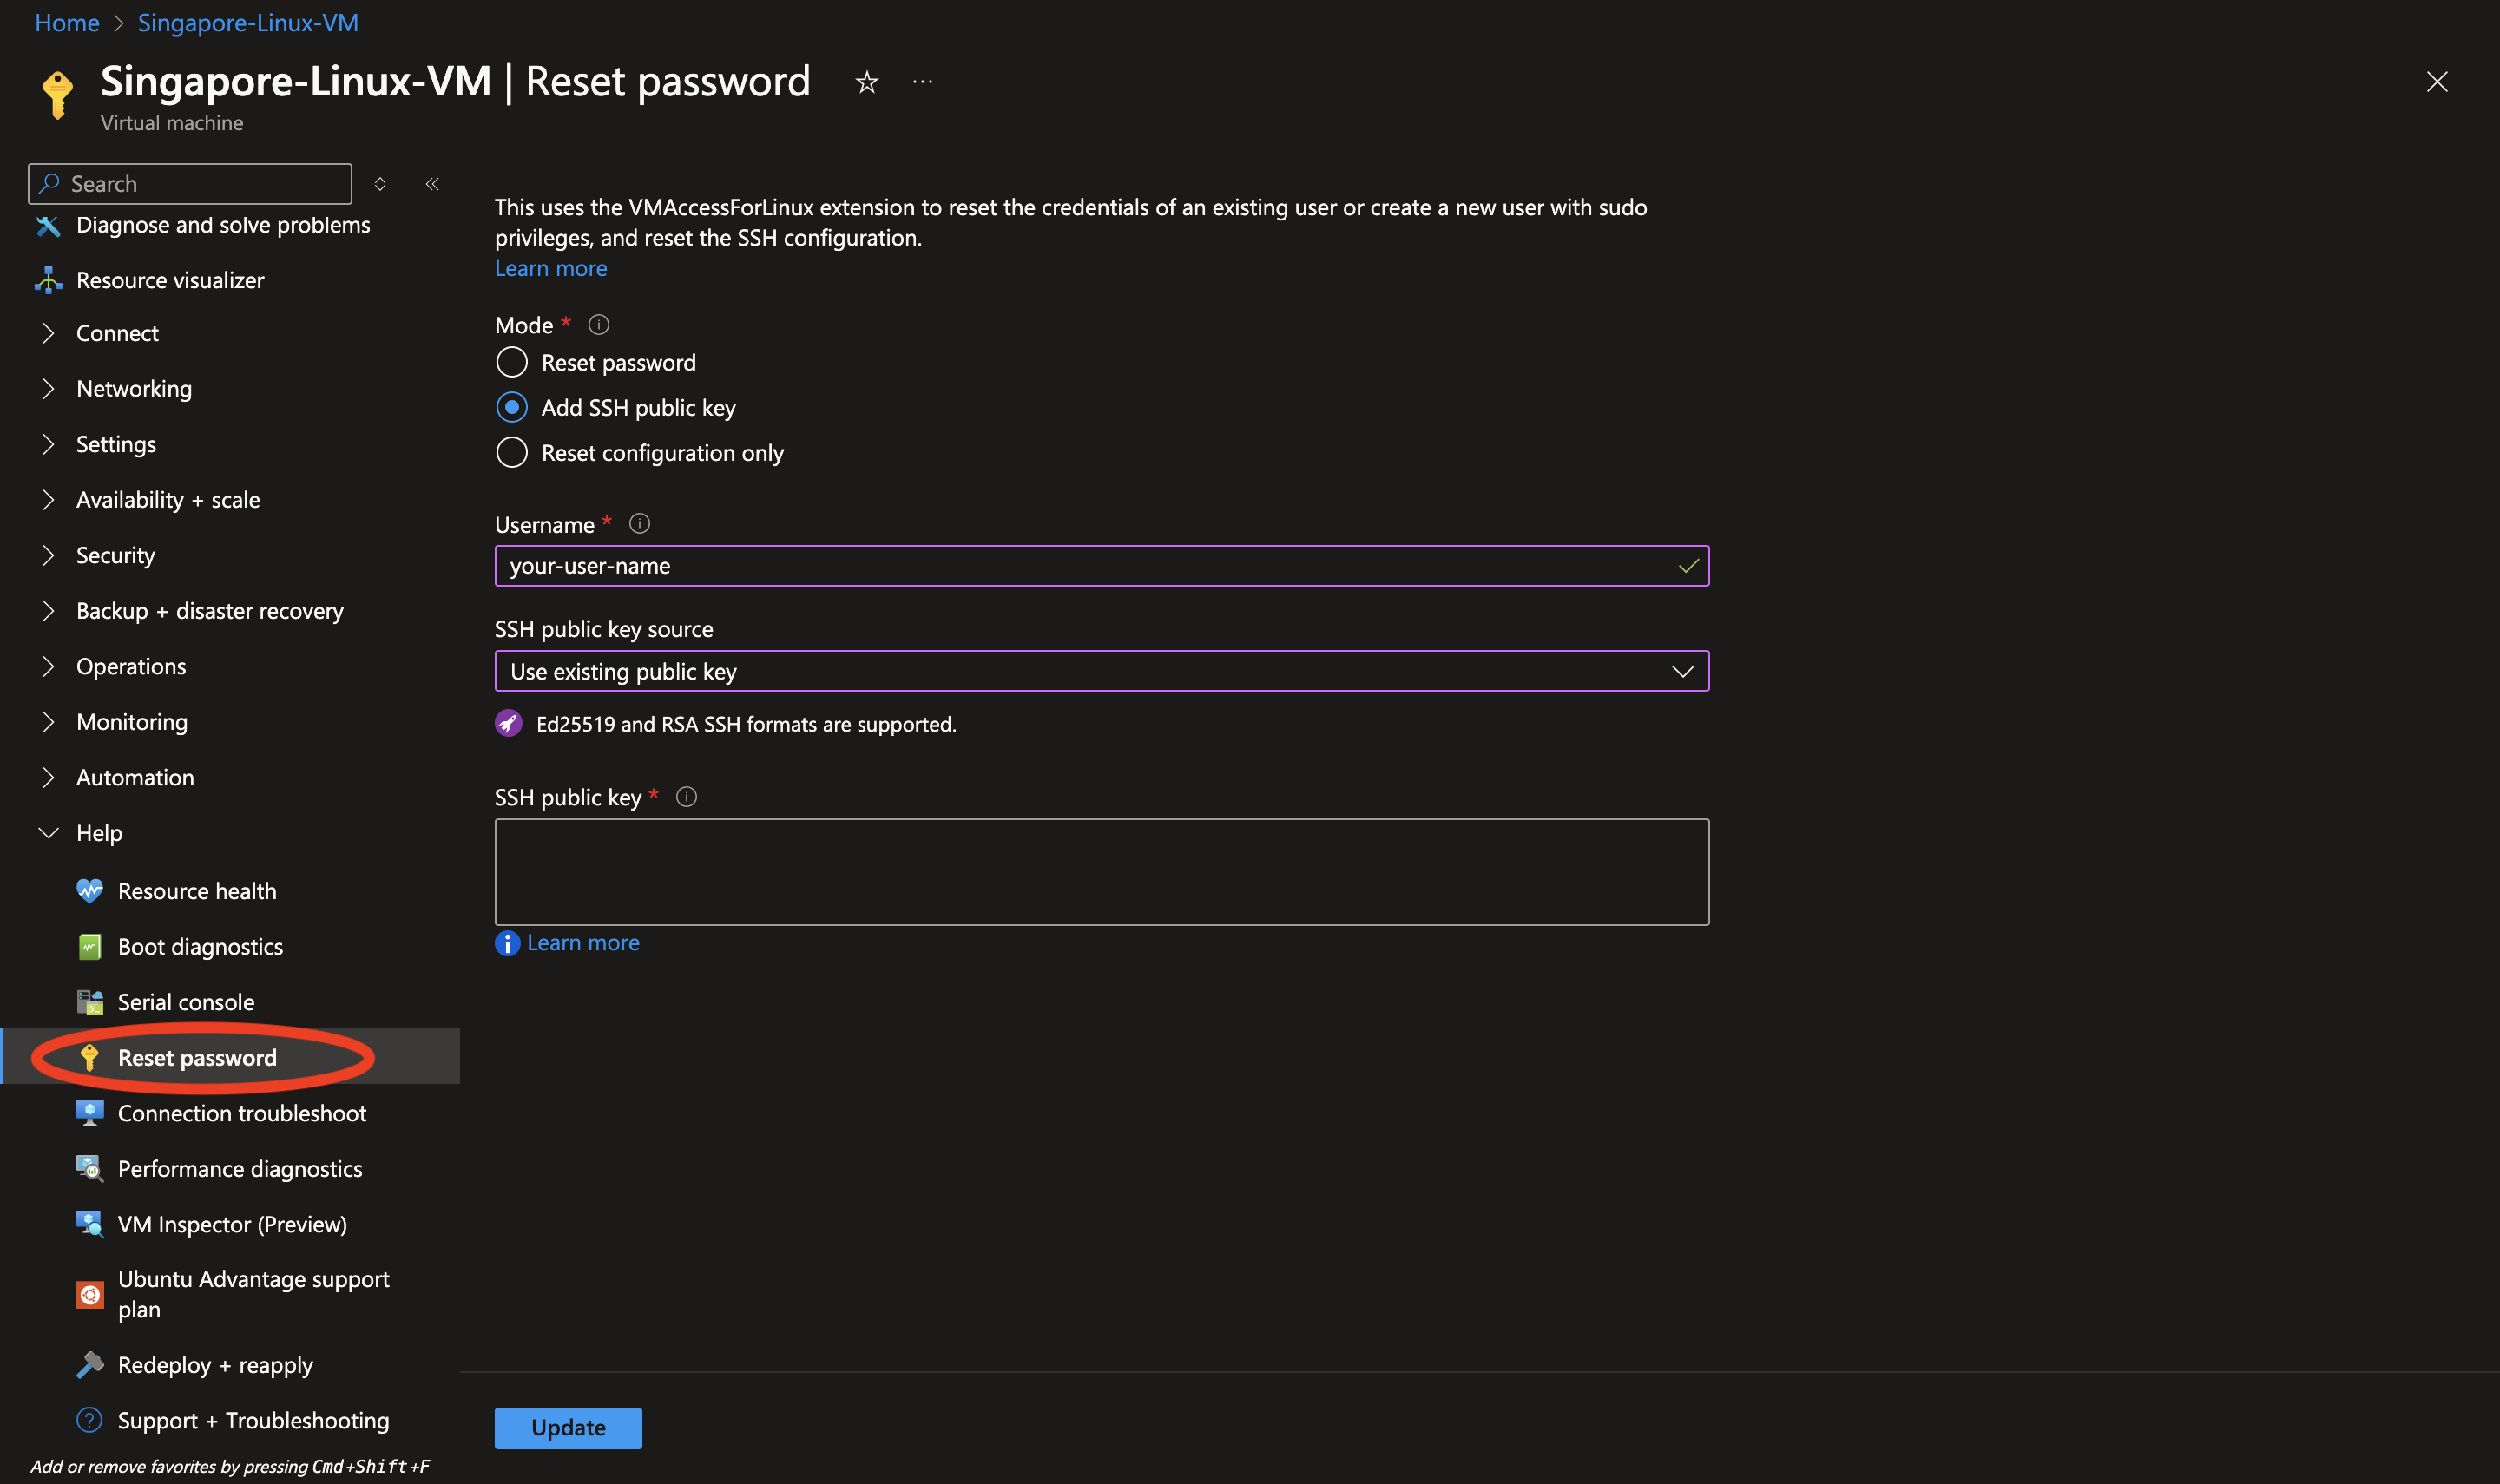
如果用的是 Azure Linux VM,可以在 Azure portal 中添加 SSH public key。
在 GCP 中则是需要进入 VM instance edit 这个位置:
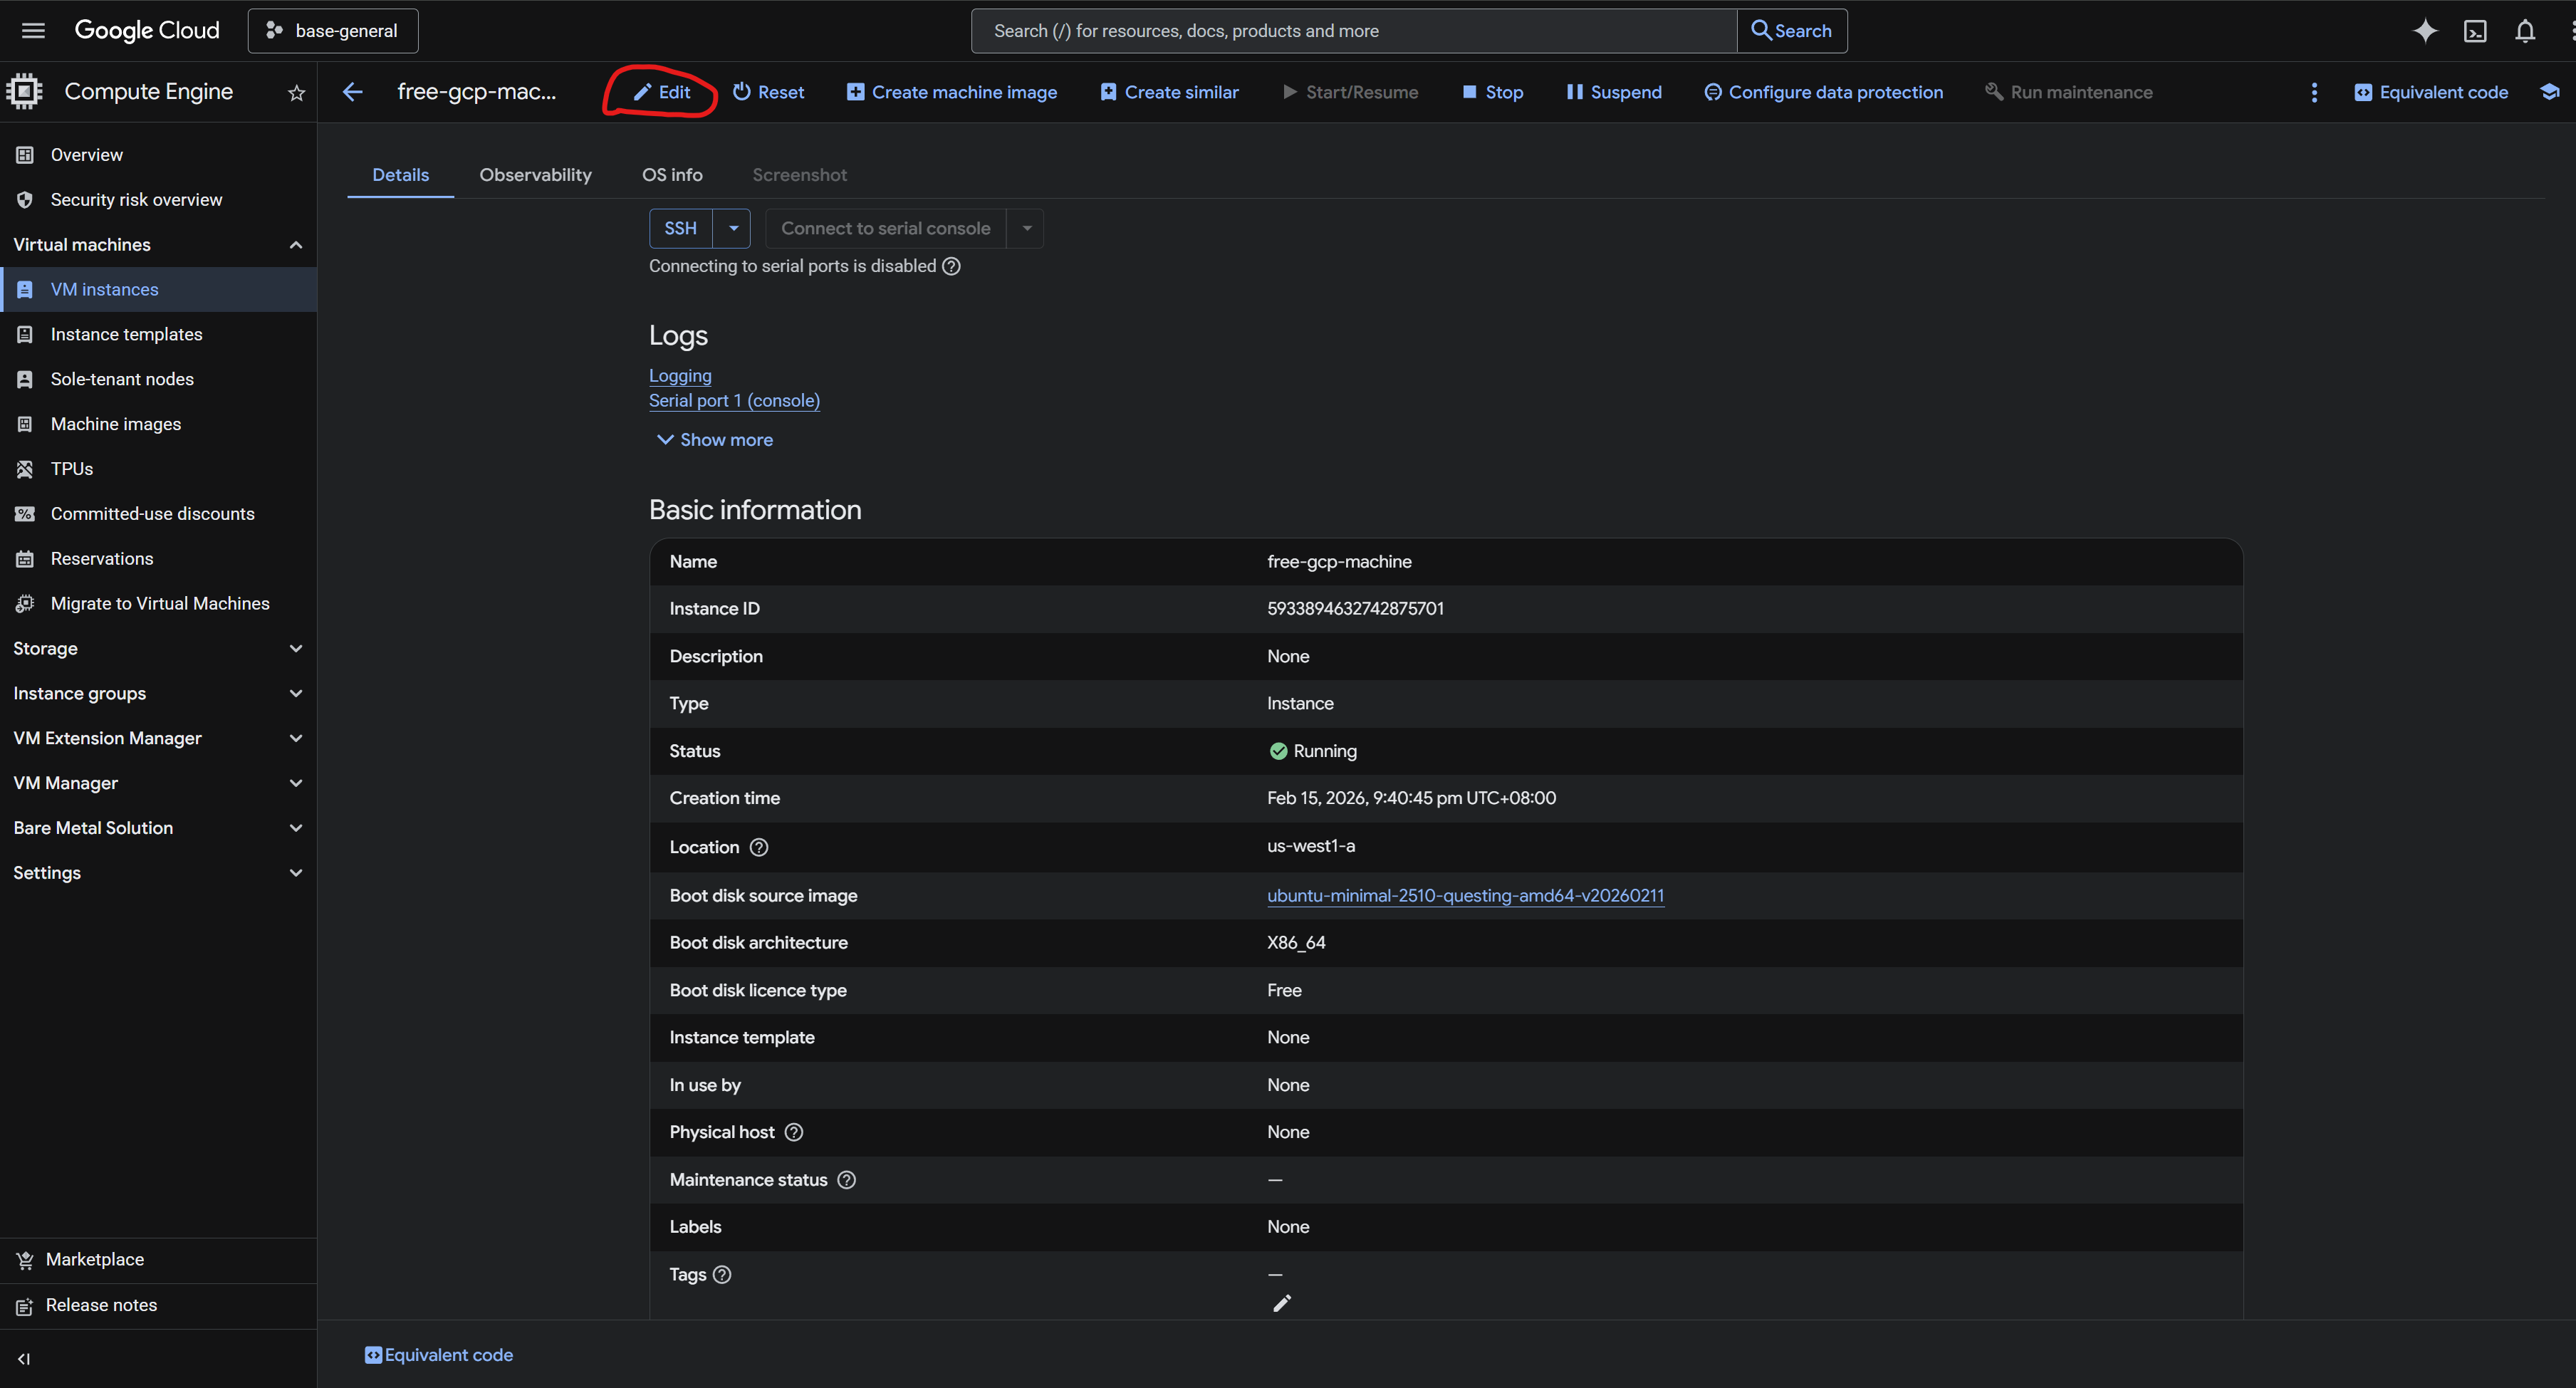
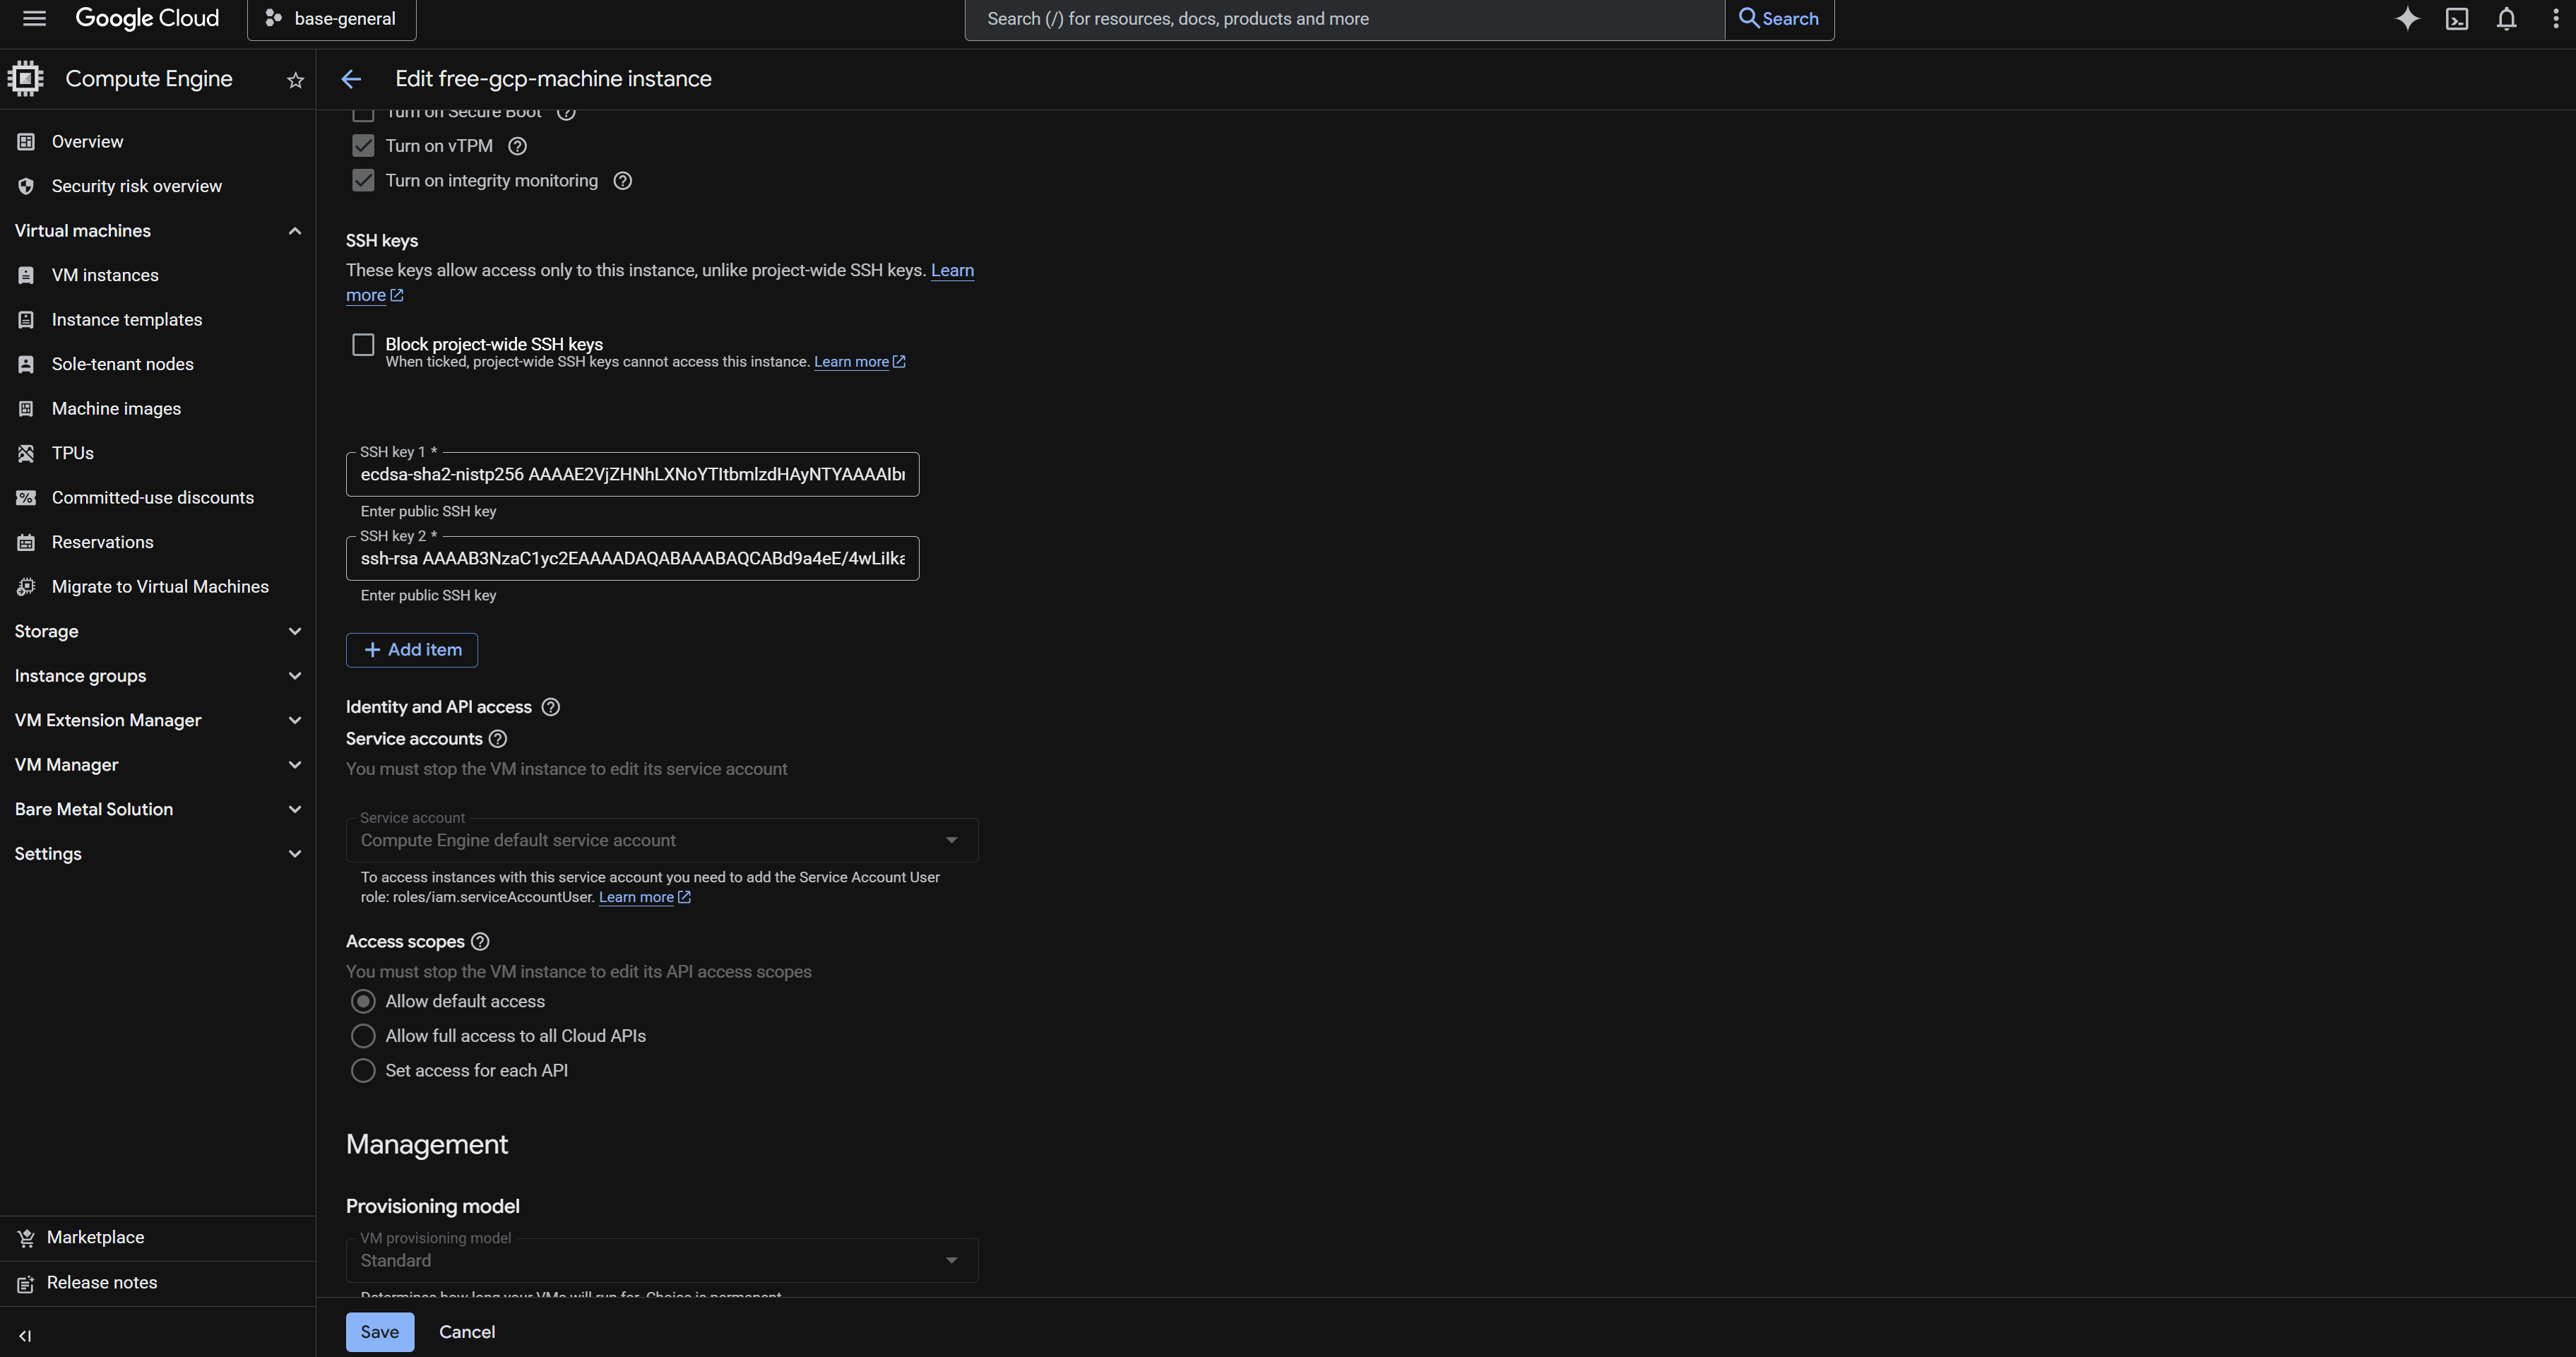
进入 edit 之后往下滑动就能看见 SSH key。
Connect With A Key
如果我们直接用 ssh username@remote-server-ip,SSH 默认会仅尝试 id_rsa 这样默认命名的密钥。
所以我们需要在命令行指定:
1 | |
当然为了方便起见,我们往往在 ~/.ssh/config 中添加配置,让 SSH 自动知道该请求要用哪个 key。
SSH Config
SSH client 可以通过 ~/.ssh/config 保存连接参数。这样我们就不需要每次输入一系列复杂的参数,而是给这些连接参数起一个名字( host entry ),然后用 ssh <Host> 快速登录。
Basic Host Entry
最小配置示例:
1 2 3 4 | |
这个配置的意思是:当执行 ssh remote-server 时,SSH client 会自动使用这里指定的 host、user 和 key。
Option Reference
实际使用时,一个 host entry 可能还会包含 port、agent、key selection、keepalive 等配置。
一个更完整的配置如下:
1 2 3 4 5 6 7 8 9 10 11 | |
IdentityFile ~/.ssh/id_rsa
请优先尝试这个 key。
AddKeysToAgent yes
SSH client 在验证成功后,自动把解密后的密钥存入 ssh-agent(如果 ssh-agent 没有启动,则不会生效)。
如果没有这一条,那么 ssh-agent 是不会在你 SSH 连接服务器的时候自动获得你的密钥的,也就是说需要你手动 ssh-add 那个 key。
IdentitiesOnly yes
连接时,只用 ~/.ssh/id_rsa 这把 key 做公钥认证;不再额外尝试其他的 key。
ServerAliveInterval 20
SSH 客户端每 20 秒给服务器发一次应用层心跳包,防止链路被当成“空闲连接”而回收。
ServerAliveCountMax 6
连续 6 次心跳没收到回复,SSH client 才断开连接,防止网络抖动时立刻断。
TCPKeepAlive yes
启用操作系统 TCP 层 keepalive。
IPQoS none
不设置 SSH 流量的 DSCP/QoS 标记。绕过某些网络设备对特定 QoS 标记处理不当导致的掉线/限速。
Tip
在 VS Code 的 Remote-SSH 插件中使用 Remote-SSH: Open SSH Configuration File... 同样编辑的就是这个文件。
改完 ~/.ssh/config 对新的 SSH 连接会立刻生效,不需要重启 Windows,也通常不需要重启 ssh-agent。
SSH Agent
如果我们的 ssh key 设置了密码,那么我们每次连接的时候都需要输入,为了更加方便,我们可以使用 ssh agent 存储解密后的私钥(在内存中缓存已解密的私钥),使得只需要输入一次 passphrase,就可以在会话期间重复使用。
Windows
查看 ssh-agent 服务:
1 | |
启动服务:
1 | |
设置为自动启动:
1 | |
添加 SSH key 到 ssh-agent:
1 | |
查看已经添加的 SSH key:
1 | |
Linux/Mac
首先查看 ssh-agent 是否已经启动:
1 | |
如果 ssh-agent 运行中,会显示其进程 ID(PID);如果没有运行,则输出为空。
如果显示为空,那么使用下面的命令启动 ssh-agent:
1 | |
添加 SSH 私钥:
1 | |
Persistence
为了实现 ssh-agent 持久化,可以将这些命令添加到 shell 配置文件中。
对于 Bash(~/.bashrc 或 ~/.bash_profile):
1 2 3 | |
保存文件后,重新加载配置:
1 | |
这样设置后,每次打开新的终端会话时,ssh-agent 都会自动启动,并且会添加你的 SSH 密钥。
SSH Agent For AI Coding Agents
在使用 Codex 这类 coding agent 的时候,SSH Agent 会遇到一个额外的问题:coding agent 执行 ssh 或 git push 的进程,不一定和我们手动操作的 terminal 是同一个 shell session。
如果 SSH private key 设置了 passphrase,那么普通 terminal 可以在第一次使用时输入 passphrase,然后把解密后的 key 加入 ssh-agent。但是 coding agent 通常不能在命令执行过程中让我们输入 passphrase;如果它也看不到当前 session 的 SSH_AUTH_SOCK,就无法复用已经解锁的 key。
一个直接但不太理想的做法是给 private key 去掉 passphrase。这样 coding agent 可以直接使用这个 key,但风险是:只要 private key 文件被读取,就可以被直接拿去使用。
更好的做法是:让 coding agent 使用 ssh-agent,而不是直接持有没有 passphrase 的 private key。
The Core Idea
SSH_AUTH_SOCK 指向的是 ssh-agent 的 socket。这个 socket 不是用来存放解密后的 key 的文件,而是通往 ssh-agent 进程的入口。
真正解密后的 private key 存在 ssh-agent 进程的内存里。其他程序通过 socket 请求 ssh-agent 帮它完成签名,但不会直接读取 private key 本身。
所以这里的授权模型是:
1 | |
也就是说,我们可以让 coding agent 访问 agent socket,让它在当前授权窗口内使用 key;当 key 从 agent 中移除、agent 退出、或者 socket 不再暴露时,coding agent 就不能继续使用这个 key。
Fixed Agent Socket
在普通 terminal 中,SSH_AUTH_SOCK 通常会指向当前 shell session 里的 agent socket。但是在 VS Code Remote-SSH、GUI app、extension host、task runner 这类场景下,不同进程不一定共享同一个 shell session。
因此只依赖 SSH_AUTH_SOCK 的环境变量继承并不稳定。更稳的方式是使用一个固定路径的 agent socket,例如:
1 | |
然后让 ssh-agent 监听这个 socket:
1 2 3 4 5 6 7 | |
如果希望每次打开 terminal 都自动使用这个固定 socket,可以把这段放到 ~/.bashrc 或对应 shell 的配置文件中。
IdentityAgent
除了在 shell 中设置 SSH_AUTH_SOCK,还可以在 ~/.ssh/config 里使用 IdentityAgent,让 OpenSSH 固定使用某个 agent socket。
例如:
1 2 3 4 5 6 | |
这样做之后,即使 coding agent 不是从当前 terminal 启动的,只要它执行的是普通 ssh 或 git push,OpenSSH 也会根据 IdentityAgent ~/.ssh/agent.sock 找到同一个 ssh-agent。
AddKeysToAgent yes 的作用是:当这把 key 被成功使用后,SSH client 会尝试把解密后的 key 加入 agent。前提是 agent 已经存在,并且 SSH client 能找到它。
Temporary Authorization
如果我们希望 key 只在一段时间内可用,可以使用 ssh-add -t:
1 | |
这表示把 key 加入 agent,但只保留 1 小时。
也可以在不需要的时候手动移除:
1 | |
或者清空当前 agent 中的所有 key:
1 | |
这种方式比较适合 coding agent:我们仍然给 private key 设置 passphrase,但在需要的时候临时把 key 加进 ssh-agent。coding agent 可以在这个授权窗口内使用 key,窗口结束后就不能继续使用。
VS Code Remote-SSH
在 VS Code Remote-SSH 场景中,VS Code 会在 remote machine 上启动 VS Code Server,extension 也可能运行在 remote machine 上。这个 extension host 和 integrated terminal 在同一台机器上,但不一定是同一个 shell session。
所以如果只是在 integrated terminal 里临时 export SSH_AUTH_SOCK=...,Codex extension 不一定能看到这个变量。
更稳定的做法是:
- 在 remote machine 上使用固定 socket,例如
~/.ssh/agent.sock - 在
~/.ssh/config里通过IdentityAgent ~/.ssh/agent.sock指向它 - 在需要授权时,手动
ssh-add -t 1h ~/.ssh/<key-filename>
这样即使 coding agent 和 terminal 不是同一个 session,它们执行 ssh 或 git push 时也会通过同一个 agent socket。
Security Notes
使用 agent socket 比直接给 coding agent 一把没有 passphrase 的 private key 更安全,因为 private key 本身不会被交给 coding agent。
但要注意:只要某个进程可以访问 agent socket,它就可以在当前授权窗口内请求 ssh-agent 使用里面的 key。因此这个方案解决的是“不要暴露 private key”和“授权可以过期或撤销”,不是“每一次 SSH 使用都单独确认”。
如果希望每次使用 key 都需要确认,可以了解 ssh-add -c 或使用 1Password SSH Agent 这类带确认机制的 agent。