Complete SSH Client Guide

Before We Begin
When we use SSH to connect to a remote server, we need to enter a username and password to log in.
However, this can lead to security issues. For example, a server with a public IP may face password brute-force attacks. For security reasons, we usually use an SSH key instead.
Connection Basics
An SSH connection usually consists of the following parts:
User: the username used to log in to the remote serverHostName: the remote server's public IP, private IP, or domain namePort: the port that the SSH server listens on. The default is22Authentication: the authentication method, such as password or SSH key
The most basic connection command is:
1 | |
If the SSH server does not use the default port 22, you need to specify the port:
1 | |
Create A Key Pair
Use the following command to generate an SSH key:
1 | |
-t: type, specifies the rsa algorithm
-b: bits, specifies the security bit length. For rsa, at least 2048 is recommended
-C: comments
-f: file, specifies the output file name
This generates ~/.ssh/<key-filename> (private key) and ~/.ssh/<key-filename>.pub (public key).
During generation, we can choose whether to add a passphrase to the private key. If one is added, you need to enter the passphrase when logging in to decrypt the private key.
The comment we write (note) is recorded at the end of the public key file. You can open the .pub file directly to view it.
For the file name, it is best to use a meaningful name, such as Singapore-Linux-VM-SSH-Key.
e.g.
1 2 3 4 5 6 7 8 9 10 11 12 13 14 15 16 17 18 19 20 | |
Note
In a Windows PowerShell environment, this command may ask you to enter the passphrase twice, then fail with an error:
powershell
Generating public/private rsa key pair.
Enter passphrase (empty for no passphrase):
Enter same passphrase again:
Saving key "~/.ssh/github-ssh-key" failed: No such file or directory
This is because in some versions of PowerShell, the ~ symbol is not expanded by PowerShell before being passed to the command.
For example: Powershell does not expand '~' for external programs · Issue #20031 · PowerShell/PowerShell
Install The Public Key
Since the SSH key has been generated, we need to add the public key to the remote server.
Use ssh-copy-id
1 | |
If you use the default port 22, you can omit the -p <ssh-port> parameter.
e.g.
1 2 3 4 5 6 7 8 9 10 | |
Note
The ssh-copy-id command is not available in Windows PowerShell. In this case, you can open Git Bash and run the command there.
Add authorized_keys Manually
If the command-line method does not work, we can manually add the public key to the server.
First log in to the server, open the ~/.ssh/authorized_keys file, and copy the contents of the .pub file into it.
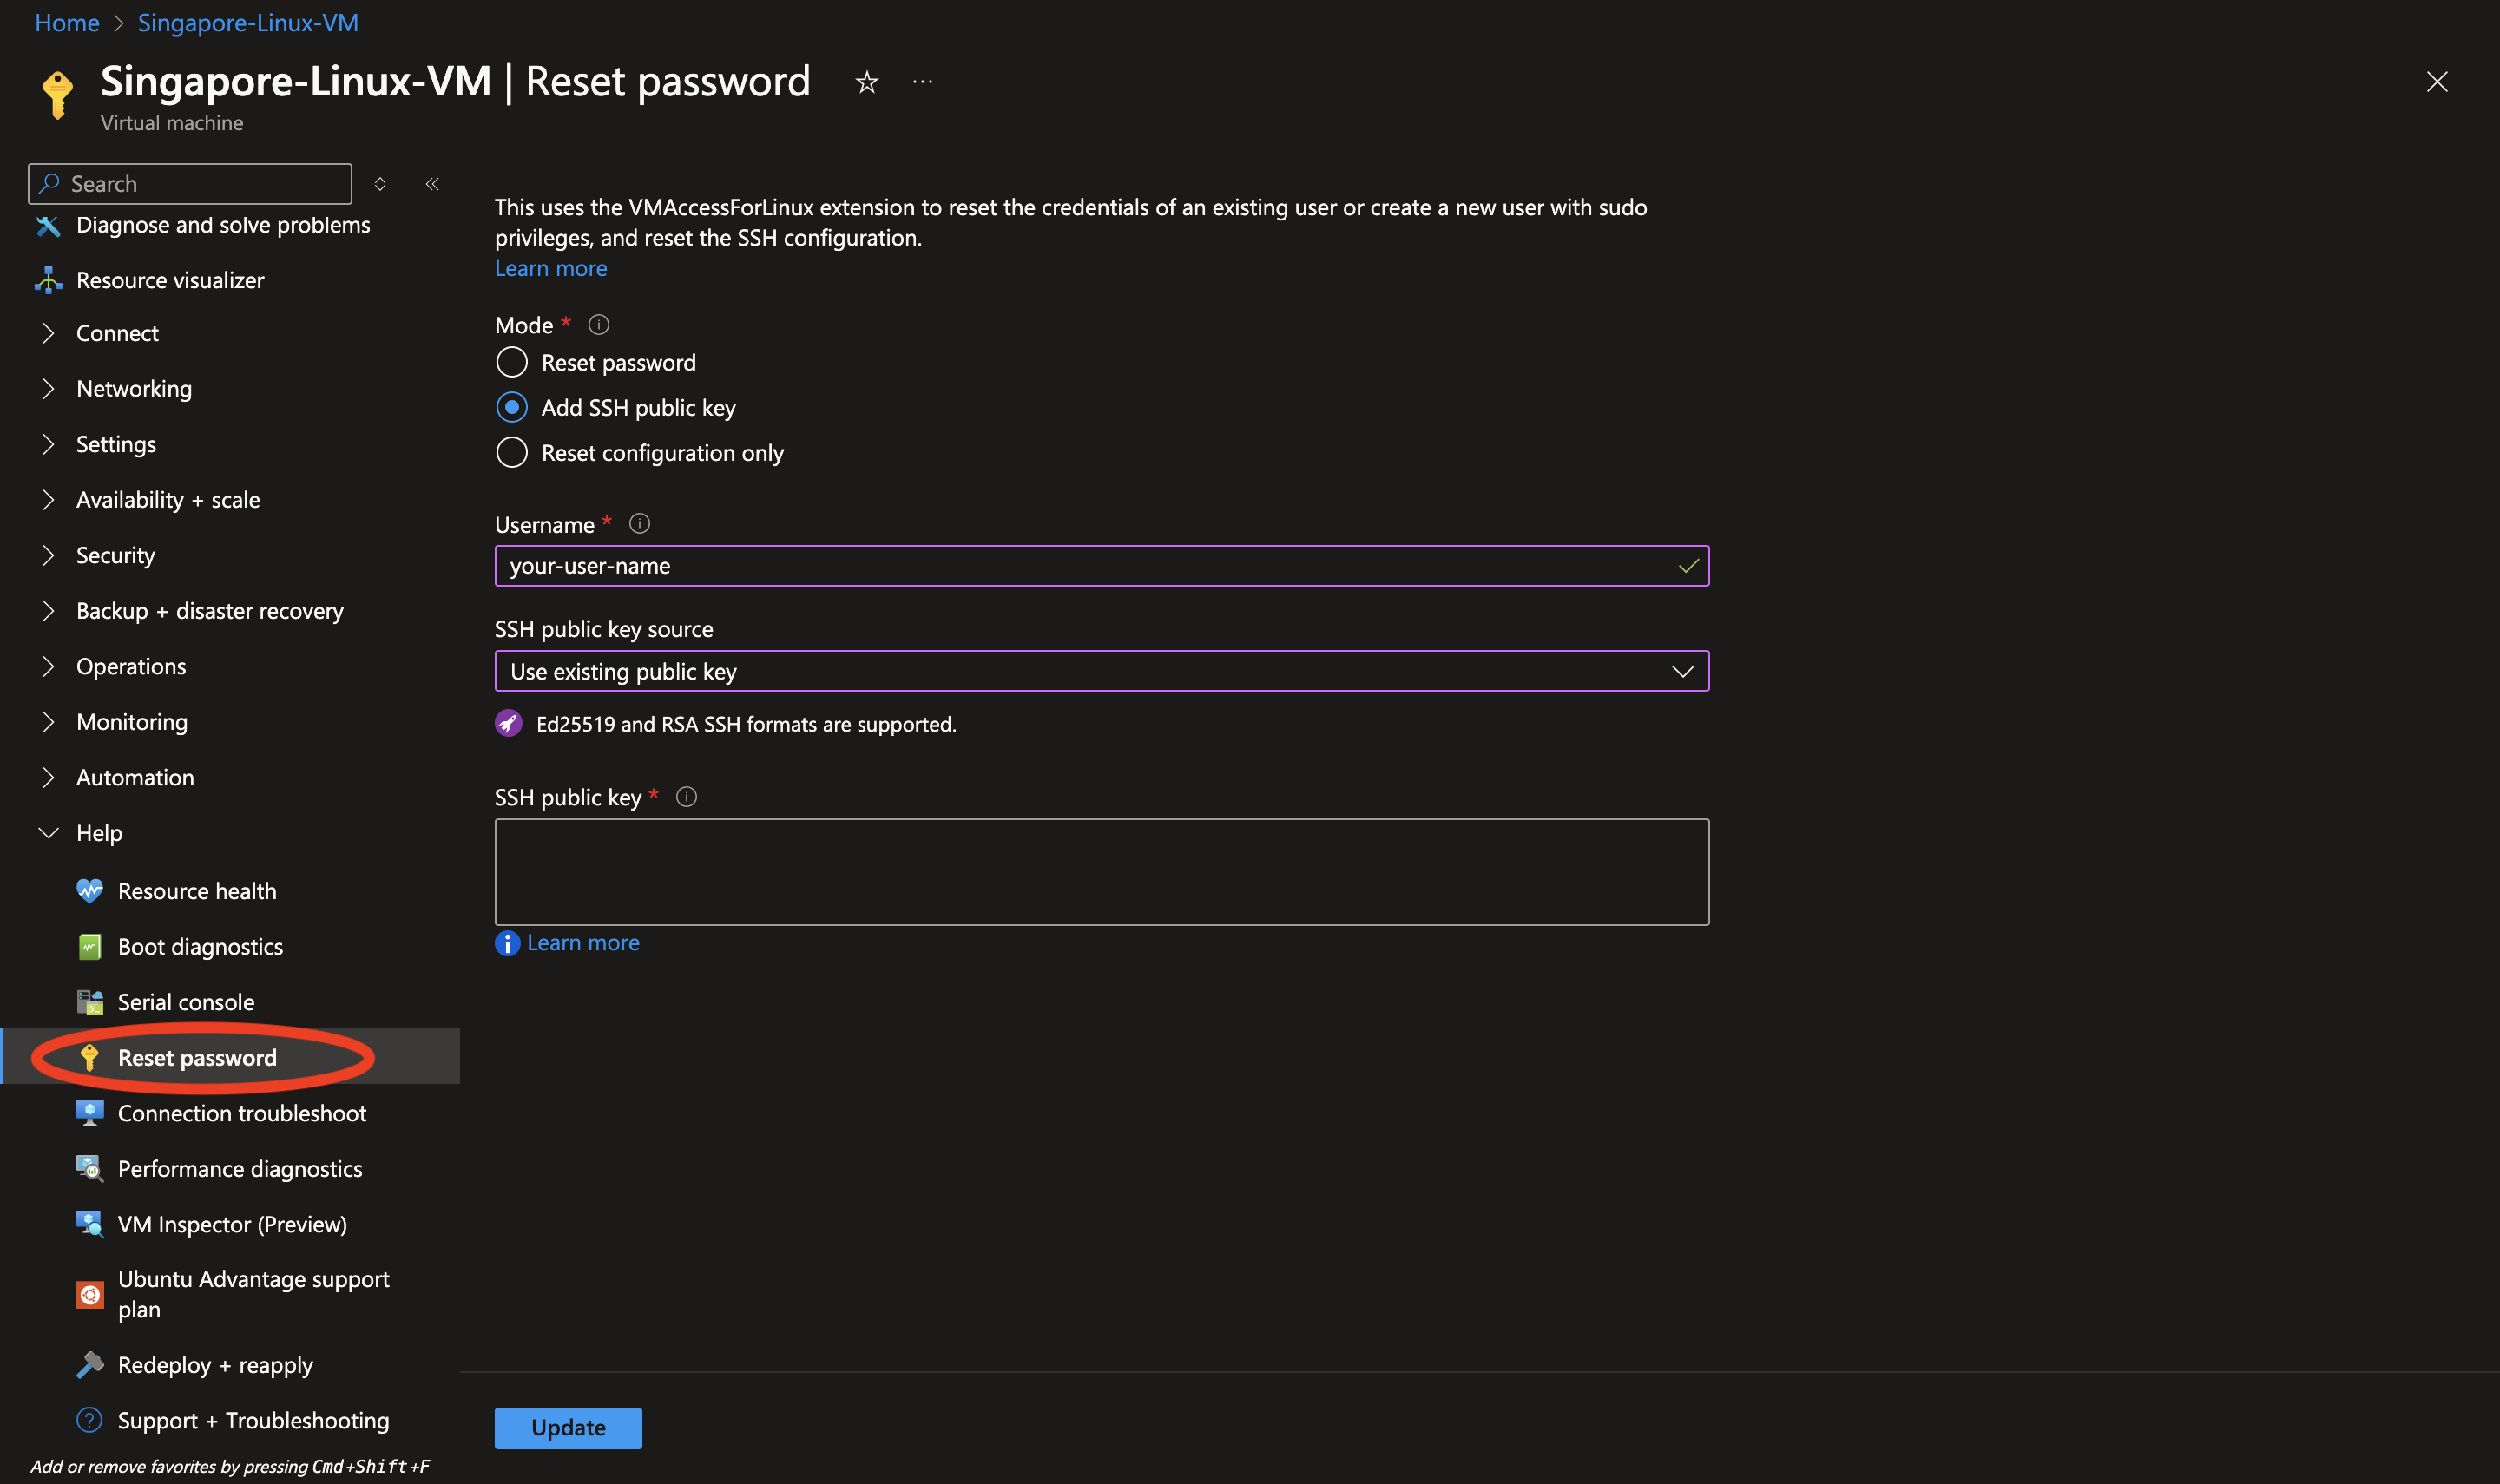
Add Key in Cloud VM Console
If you are using an Azure Linux VM, you can add the SSH public key in the Azure portal.
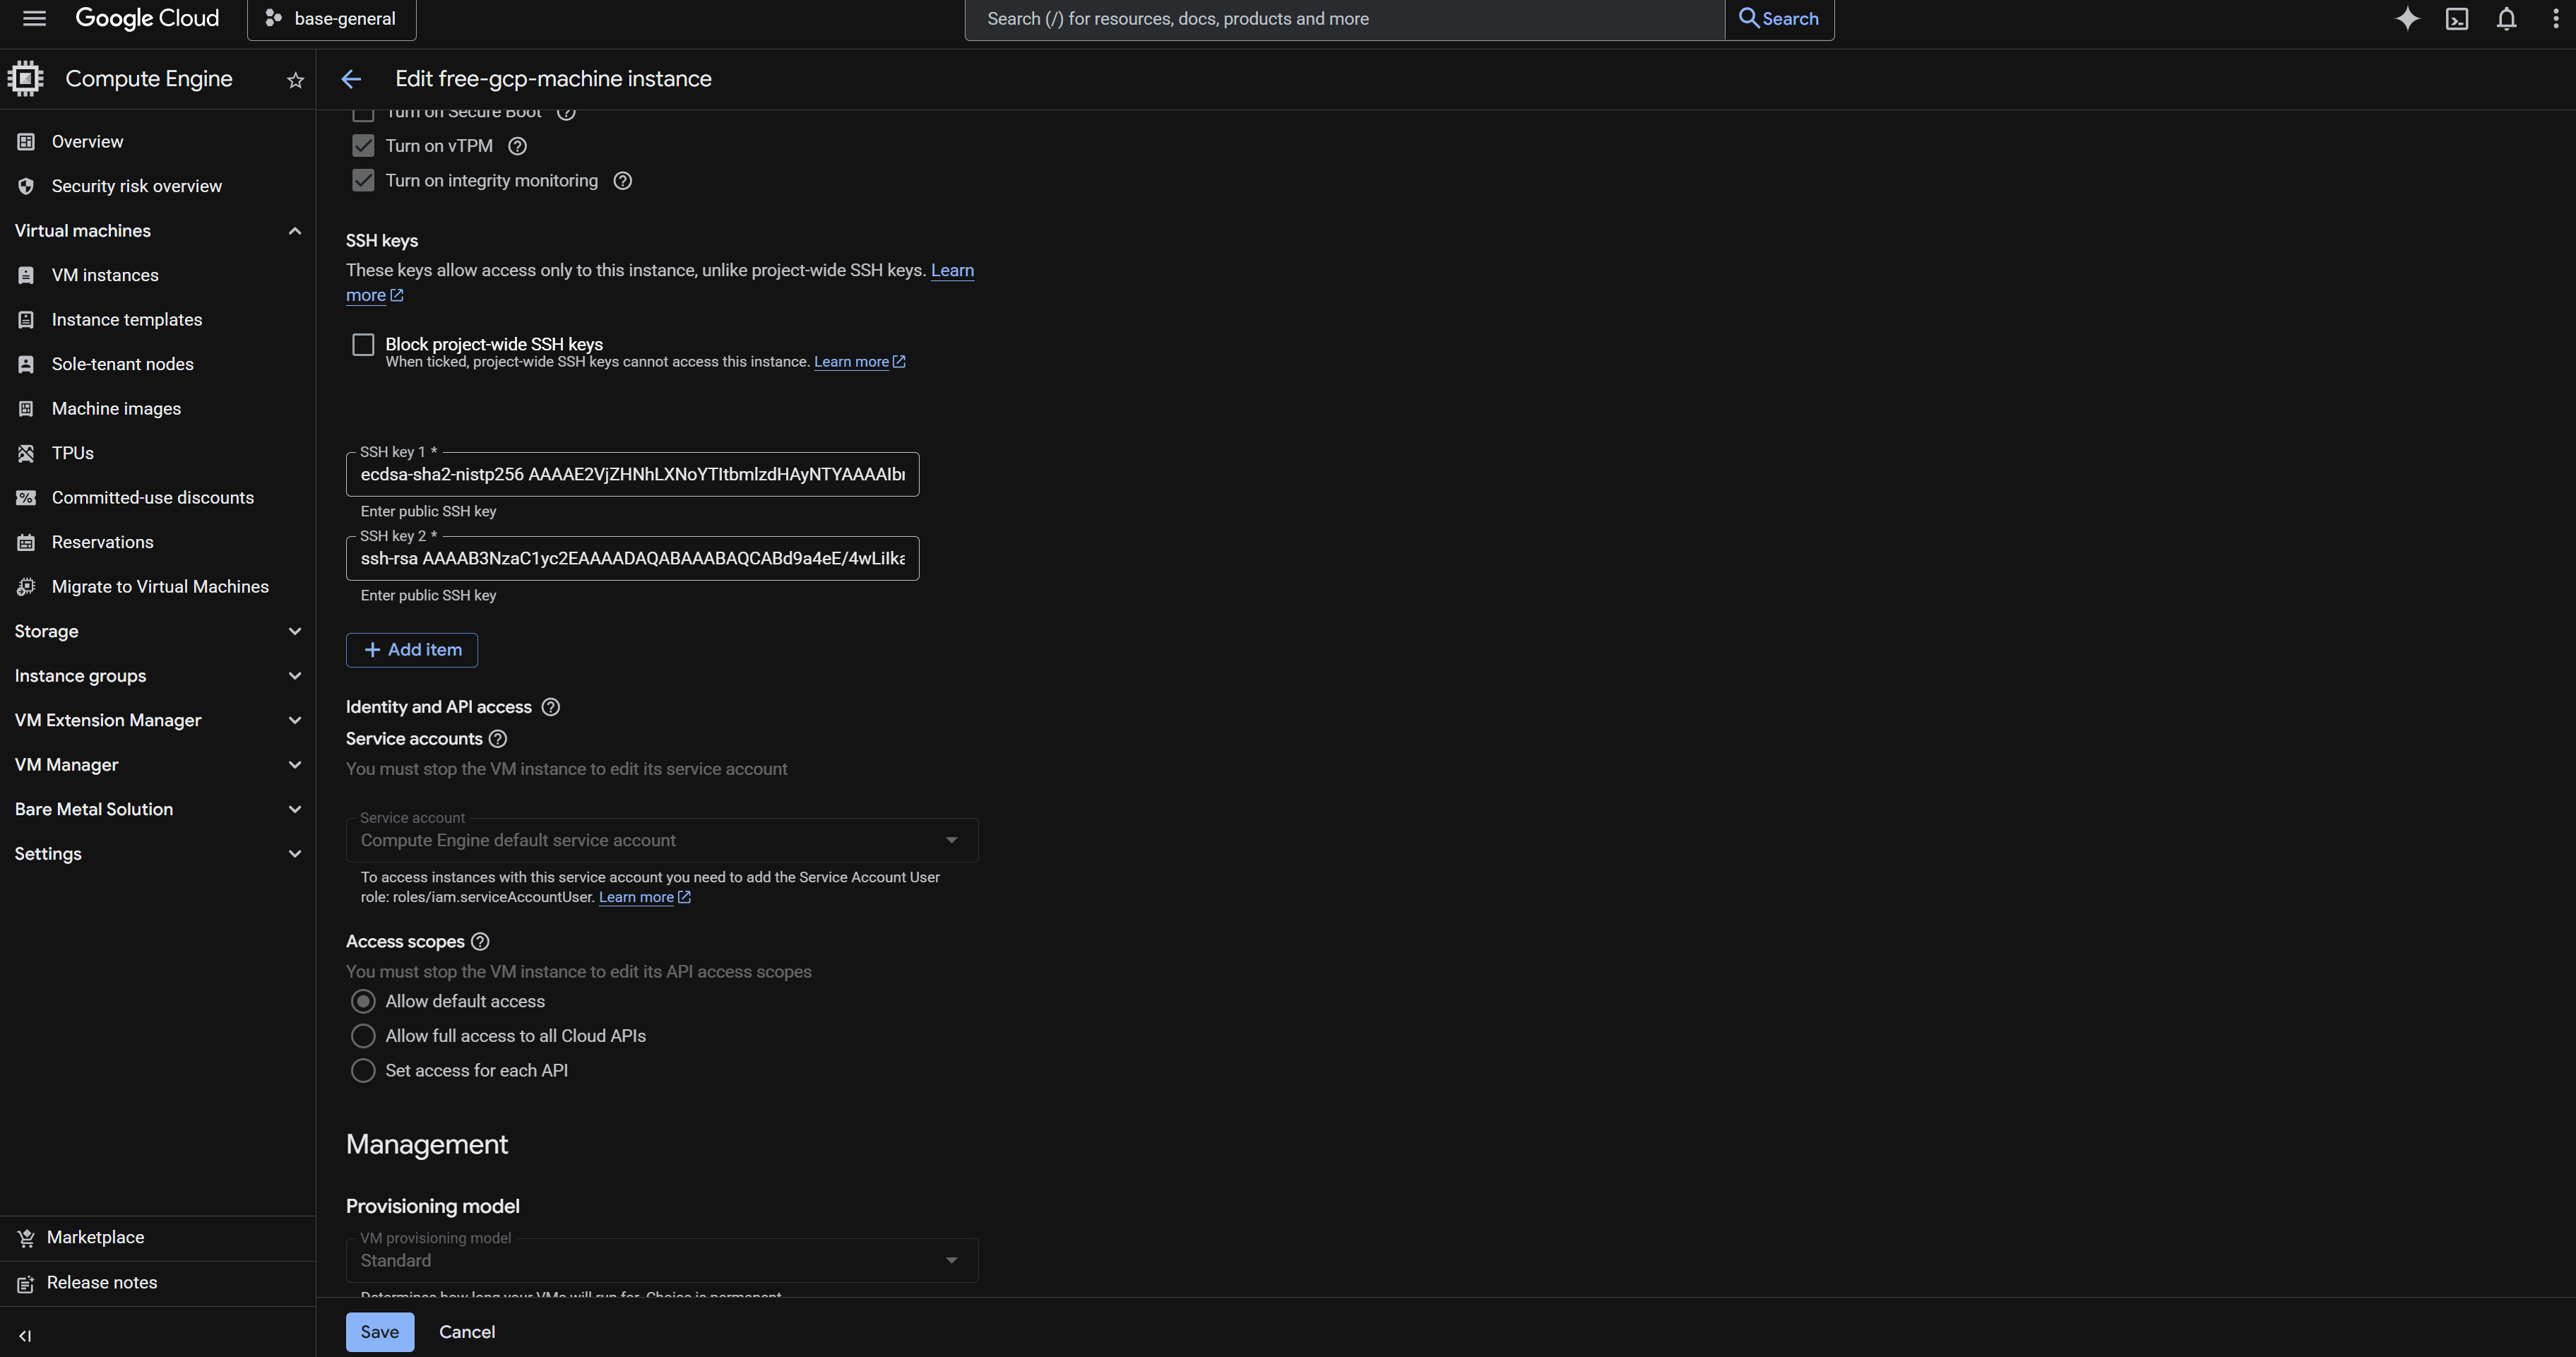
In GCP, you need to go to the VM instance edit page:
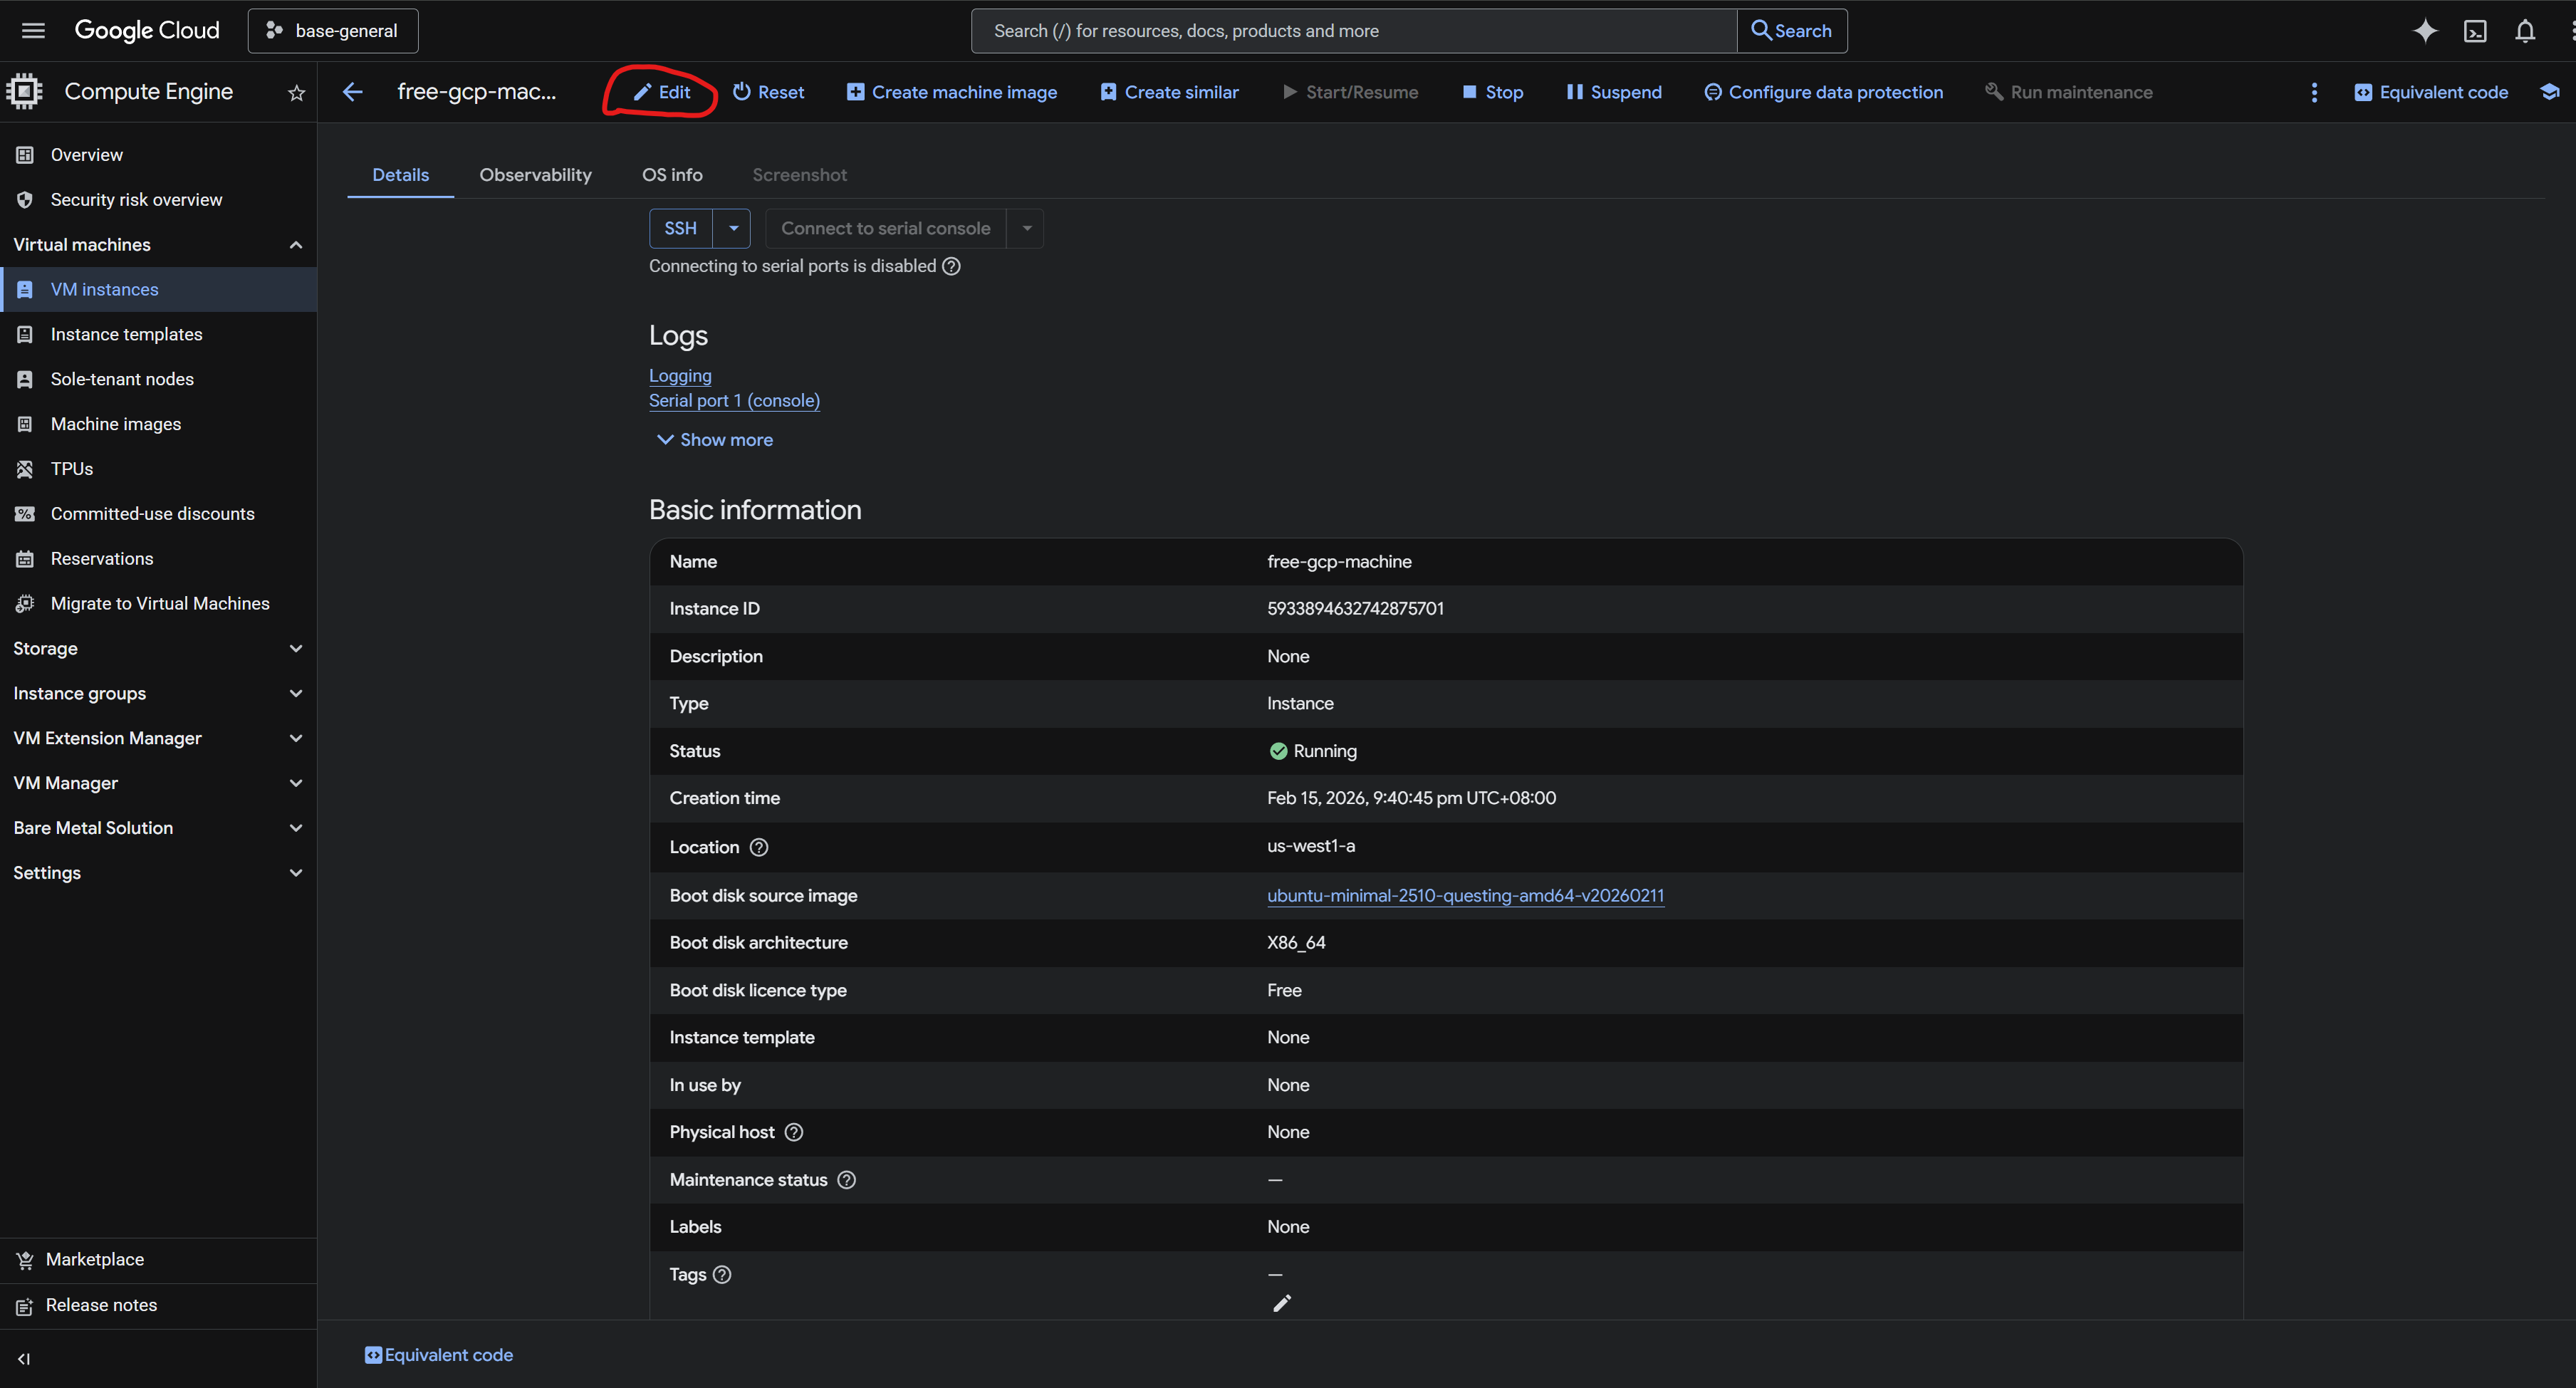
After entering edit mode, scroll down to find SSH keys.
Connect With A Key
If we directly use ssh username@remote-server-ip, SSH will, by default, only try keys with default names such as id_rsa.
So we need to specify the key on the command line:
1 | |
Of course, for convenience, we usually add configuration to ~/.ssh/config so that SSH automatically knows which key to use for a request.
SSH Config
The SSH client can save connection parameters in ~/.ssh/config. This way, we do not need to enter a series of complex parameters every time. Instead, we give these connection parameters a name, called a host entry, and then quickly log in with ssh <Host>.
Basic Host Entry
Minimum configuration example:
1 2 3 4 | |
This configuration means: when you run ssh remote-server, the SSH client will automatically use the host, user, and key specified here.
Option Reference
In actual use, a host entry may also include configurations such as port, agent, key selection, and keepalive.
A more complete configuration is as follows:
1 2 3 4 5 6 7 8 9 10 11 | |
IdentityFile ~/.ssh/id_rsa
Try this key first.
AddKeysToAgent yes
After successful authentication, the SSH client automatically stores the decrypted key in ssh-agent. If ssh-agent is not running, this does not take effect.
Without this option, ssh-agent will not automatically obtain your key when you connect to a server via SSH. In other words, you need to manually run ssh-add for that key.
IdentitiesOnly yes
During the connection, only use ~/.ssh/id_rsa for public key authentication. Do not additionally try other keys.
ServerAliveInterval 20
The SSH client sends an application-level heartbeat packet to the server every 20 seconds to prevent the connection from being reclaimed as an “idle connection”.
ServerAliveCountMax 6
The SSH client disconnects only after 6 consecutive heartbeats receive no response, preventing immediate disconnection during network fluctuations.
TCPKeepAlive yes
Enable operating-system-level TCP keepalive.
IPQoS none
Do not set DSCP/QoS markings for SSH traffic. This avoids disconnections or speed limits caused by some network devices mishandling specific QoS markings.
Tip
In VS Code's Remote-SSH extension, Remote-SSH: Open SSH Configuration File... edits this same file.
Changes to ~/.ssh/config take effect immediately for new SSH connections. You do not need to restart Windows, and usually do not need to restart ssh-agent.
SSH Agent
If our SSH key has a password, we need to enter it every time we connect. For convenience, we can use ssh-agent to store the decrypted private key in memory, so that after entering the passphrase once, the key can be reused during the session.
Windows
Check the ssh-agent service:
1 | |
Start the service:
1 | |
Set it to start automatically:
1 | |
Add an SSH key to ssh-agent:
1 | |
View the SSH keys that have been added:
1 | |
Linux/Mac
First check whether ssh-agent has already started:
1 | |
If ssh-agent is running, it displays its process ID (PID). If it is not running, the output is empty.
If the output is empty, use the following command to start ssh-agent:
1 | |
Add the SSH private key:
1 | |
Persistence
To make ssh-agent persistent, you can add these commands to your shell configuration file.
For Bash (~/.bashrc or ~/.bash_profile):
1 2 3 | |
After saving the file, reload the configuration:
1 | |
After this setup, ssh-agent will automatically start whenever you open a new terminal session, and it will add your SSH key.
SSH Agent For AI Coding Agents
When using coding agents such as Codex, SSH Agent encounters an extra issue: the process where the coding agent runs ssh or git push is not necessarily in the same shell session as the terminal we operate manually.
If an SSH private key has a passphrase, a normal terminal can ask for the passphrase the first time it is used, then add the decrypted key to ssh-agent. But a coding agent usually cannot ask us to enter a passphrase during command execution. If it also cannot see the current session's SSH_AUTH_SOCK, it cannot reuse the already unlocked key.
A direct but less ideal approach is to remove the passphrase from the private key. This lets the coding agent use the key directly, but the risk is: as long as the private key file can be read, it can be used directly.
A better approach is to let the coding agent use ssh-agent instead of directly holding a private key without a passphrase.
The Core Idea
SSH_AUTH_SOCK points to the ssh-agent socket. This socket is not a file that stores the decrypted key. It is the entry point to the ssh-agent process.
The truly decrypted private key exists in the memory of the ssh-agent process. Other programs request ssh-agent through the socket to complete signing, but they do not directly read the private key itself.
So the authorization model here is:
1 | |
In other words, we can let the coding agent access the agent socket so it can use the key within the current authorization window. When the key is removed from the agent, the agent exits, or the socket is no longer exposed, the coding agent can no longer continue using this key.
Fixed Agent Socket
In a normal terminal, SSH_AUTH_SOCK usually points to the agent socket in the current shell session. But in scenarios such as VS Code Remote-SSH, GUI apps, extension hosts, and task runners, different processes do not necessarily share the same shell session.
Therefore, relying only on inheritance of the SSH_AUTH_SOCK environment variable is not stable. A more stable approach is to use an agent socket at a fixed path, such as:
1 | |
Then let ssh-agent listen on this socket:
1 2 3 4 5 6 7 | |
If you want every terminal to automatically use this fixed socket, you can put this snippet in ~/.bashrc or the corresponding shell configuration file.
IdentityAgent
In addition to setting SSH_AUTH_SOCK in the shell, you can also use IdentityAgent in ~/.ssh/config to make OpenSSH always use a specific agent socket.
For example:
1 2 3 4 5 6 | |
After doing this, even if the coding agent is not started from the current terminal, as long as it runs normal ssh or git push, OpenSSH will find the same ssh-agent according to IdentityAgent ~/.ssh/agent.sock.
The purpose of AddKeysToAgent yes is: after this key is successfully used, the SSH client will try to add the decrypted key to the agent. The prerequisite is that the agent already exists and the SSH client can find it.
Temporary Authorization
If we want the key to be available only for a period of time, we can use ssh-add -t:
1 | |
This means adding the key to the agent, but keeping it for only 1 hour.
You can also manually remove it when it is no longer needed:
1 | |
Or clear all keys in the current agent:
1 | |
This approach is suitable for coding agents: we still set a passphrase for the private key, but temporarily add the key to ssh-agent when needed. The coding agent can use the key within this authorization window, and can no longer continue using it after the window ends.
VS Code Remote-SSH
In a VS Code Remote-SSH scenario, VS Code starts VS Code Server on the remote machine, and extensions may also run on the remote machine. This extension host and the integrated terminal are on the same machine, but they are not necessarily in the same shell session.
So if you only temporarily run export SSH_AUTH_SOCK=... in the integrated terminal, the Codex extension may not see this variable.
A more stable approach is:
- Use a fixed socket on the remote machine, such as
~/.ssh/agent.sock - Point to it in
~/.ssh/configwithIdentityAgent ~/.ssh/agent.sock - When authorization is needed, manually run
ssh-add -t 1h ~/.ssh/<key-filename>
This way, even if the coding agent and terminal are not in the same session, when they run ssh or git push, they will use the same agent socket.
Security Notes
Using an agent socket is safer than directly giving the coding agent a private key without a passphrase, because the private key itself is not handed to the coding agent.
But note: as long as a process can access the agent socket, it can request ssh-agent to use the keys inside it within the current authorization window. Therefore, this approach solves “do not expose the private key” and “authorization can expire or be revoked”; it does not mean “confirm every single SSH use separately”.
If you want every use of the key to require confirmation, you can learn about ssh-add -c or use an agent with a confirmation mechanism, such as 1Password SSH Agent.